You pull up the overheads, and they are either a harsh wash of cymbals slicing your ears off, or a muddy blanket of kick and snare bleed with no shimmer at all.
So you high-pass and boost the highs for sparkle, the harshness gets worse, and the kit somehow loses its weight.
The overheads are supposed to be the glue that ties the whole kit together, and right now they are the problem.
The key thing most people miss is what overheads actually are. They are not the cymbal mics. They are the picture of the whole kit.
This guide walks the full method.
You will learn why phase comes before EQ, how to choose your high-pass based on the overheads’ job, where cymbal harshness hides, and how to add shimmer without the ice-pick highs.
TL;DR
- Check phase first. Overhead and close-mic phase issues hurt the kit more than any EQ move.
- Decide the overheads’ job: high-pass low (around 200 Hz) for a whole-kit picture, high (around 500 Hz) for cymbals only.
- Cut harshness in 2–5 kHz, where cymbals and the rest of the mix all build up.
- Add shimmer and air with a gentle shelf at 8–15 kHz.
- The recording sets the ceiling. Good mic placement does more than EQ ever can.
Keep reading for the full method, an overhead EQ cheat sheet, and how to decide what your overheads are really for.
Overhead EQ Cheat Sheet
Here are the key overhead frequencies in one place.
Treat them as starting points and sweep to confirm, since the right high-pass, in particular, depends on how you are using the overheads.
For the whole kit at a glance, the drum EQ cheat sheet covers every piece.
| Frequency | What lives there | Move |
|---|---|---|
| 200 Hz | Kit weight, kick/snare body | High-pass here for a whole-kit picture |
| 400–500 Hz | Snare bleed, boxiness | High-pass here for cymbals only, or cut |
| 300–400 Hz | Body and fullness | Small boost if thin (whole-kit use) |
| 2–5 kHz | Cymbal harshness, build-up | Cut or dynamic-cut to tame |
| 8–10 kHz | Sheen, cymbal sizzle | Boost for cut and shimmer |
| 12 kHz+ | Air, sparkle | Gentle shelf for openness |
Check Phase Before You EQ
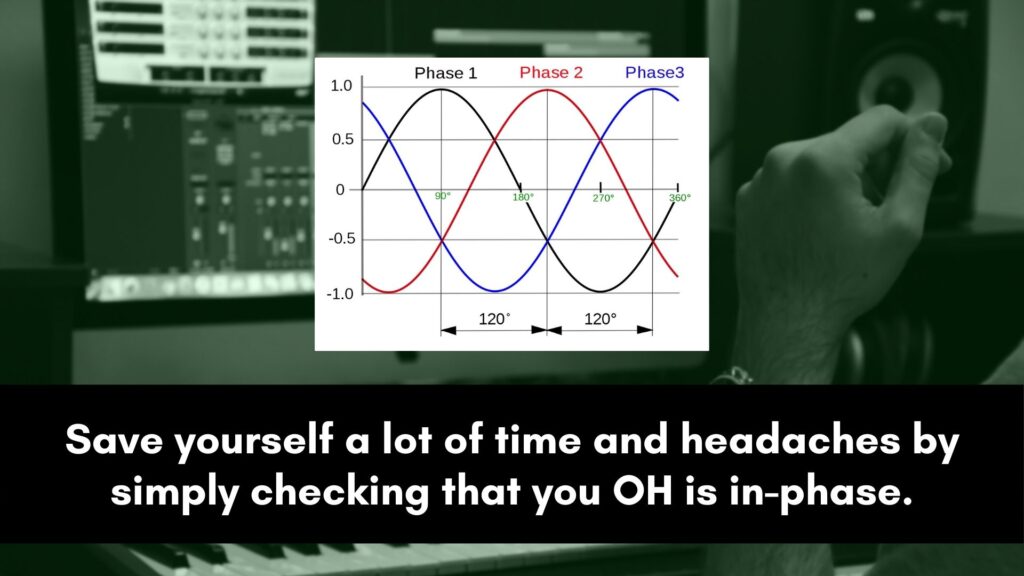
Phase is the first thing to fix, and it matters more than any EQ move.
Overheads work with the close mics and with each other, and when they are out of phase, the kit loses punch and the low end cancels out.
No amount of EQ recovers a kit that is fighting itself.
Check the overheads against the kick and snare, and check the two overheads against each other for mono compatibility.
Flip polarity, nudge timing, or adjust the blend until the kit sounds fullest and survives a mono check.
Only once the phase is right does the EQ you dial in actually behave.
Decide What Your Overheads Are For
This one decision changes every EQ move that follows. Overheads play one of two roles, and the high-pass filter is where you commit to it.
Choose before you start cutting, because the two approaches are very different.
- Whole-kit picture: high-pass low, around 200 Hz, so the overheads carry kit weight and the close mics reinforce. This is the foundation-of-the-kit approach.
- Cymbals only: high-pass high, around 400–500 Hz or more, so the overheads add only cymbals and the close mics provide the body. This keeps the low end clean.
- Match the genre: rock and jazz often use overheads as the main kit sound, while tight modern pop and metal often lean on close mics with cymbals-only overheads.
Get this right and most of your overhead EQ is already done, because the high-pass is doing the heavy lifting.
The overheads also carry the hi-hats, so coordinate them with how you EQ the close hi-hat mic rather than shaping the hats twice.
Same logic for the body of the kit: lock in kick drum EQ and snare EQ settings on their own tracks.
Then the overheads can add cymbals and weight rather than compete for the same fundamentals.
Tame Cymbal Harshness
Harshness is the most common overhead problem, and it sits where the ear is most sensitive.
The build-up in the 2–5 kHz range, with 4 kHz right in the painful center, is where cymbals turn fatiguing and clash with everything else in the mix.
Cutting here almost always helps.
Sweep a narrow band to find the harshest spot, then cut a few dB.
If the harshness only flares on loud crashes, a dynamic EQ cut tames those moments while leaving the quieter passages bright.
This is the move that turns piercing overheads into smooth, controlled ones, and it matters more than any boost.
Add Shimmer and Air
With the harshness controlled, a touch of top end gives the cymbals their sparkle.
The goal is sizzle and openness, not raw brightness, so this is a finishing move rather than a big boost.
Cut the bad highs first, then add the good ones.
A boost around 8–10 kHz brings out the cymbal sheen and helps the overheads cut, while a gentle high shelf above 12 kHz adds air and sparkle to the whole kit.
Keep both subtle, since overheads are easy to push into harshness, and always check that more air is not just amplifying the 2–5 kHz problem you already tamed.
The Recording Sets the Ceiling

No EQ fixes a badly captured overhead.
Mic choice, placement, and the room set the ceiling on how good the overheads can sound, and EQ only shapes what is already there.
If the overheads are harsh or unbalanced at the source, the real fix is in the recording.
Consistent mic heights, careful placement over the kit, and attention to the balance between cymbals and the rest of the kit all do more than any plugin.
When you are mixing tracks you did not record, do your best with EQ, but remember that the next session is where the biggest improvement lives.
3 Common Mistakes
A few habits make overheads harsh or muddy. Avoid these and the moves above land.
1. EQing before checking phase. Phase problems rob the kit of punch and low end, and EQ cannot fix that.
Sort the overhead and close-mic phase first, then shape the tone.
2. Not deciding the overheads’ job. High-passing at a random frequency leaves the overheads either muddy or thin.
Decide whether they are the whole kit or cymbals only, and set the high-pass to match.
3. Boosting highs to fix harshness. Adding more top to harsh cymbals makes them worse. Cut the 2–5 kHz problem first, then add a little shimmer only if it is still needed.
Frequently Asked Questions
Quick answers to the questions that come up most when EQing drum overheads.
Where should you high-pass drum overheads?
It depends on the overheads’ job.
For a whole-kit picture, high-pass low, around 200 Hz, so the overheads carry kit weight and the close mics reinforce it.
For cymbals only, high-pass high, around 400–500 Hz or more, so the overheads add just cymbals while the close mics provide the body.
Sweep up while listening for the point where the kit starts to thin, then back off.
How do you make cymbals less harsh in overheads?
Cut, do not boost.
Cymbal harshness builds up in the 2–5 kHz range, with 4 kHz right in the most sensitive spot, so sweep a narrow band to find the worst frequency and dip it a few dB.
If the harshness only flares on loud crashes, a dynamic EQ cut tames those hits while keeping the quieter passages bright.
Check phase too, since phase issues can also make overheads sound harsh.
Should overheads capture the whole kit or just cymbals?
Either it is a creative choice you commit to with the high-pass.
Whole-kit overheads, high-passed low, make the overheads the foundation of the drum sound with close mics reinforcing, which suits rock and jazz.
Cymbals-only overheads, high-passed high, let the close mics define the kit while the overheads add just the cymbals, which suits tight modern pop and metal.
Decide first, then EQ to match.
Why do my overheads sound muddy?
Muddy overheads usually come from too much low-end bleed or a phase problem.
If you want a whole-kit sound, a phase issue with the close mics is often the culprit, so check polarity first.
If you want cymbals only, the high-pass is probably too low, so raise it toward 400–500 Hz to remove the kick and snare bleed that is clouding the track.
Tom ring also bleeds heavily through overheads at 300–600 Hz. If cutting it on the overhead bus hurts the cymbals, EQ the toms at the source instead.
Should you EQ overheads in mono or stereo?
Make your tonal decisions while checking both.
EQ in stereo for the natural width, but collapse to mono regularly to confirm the overheads and close mics are in phase and that nothing cancels out.
A kit that sounds wide and bright in stereo but thin and hollow in mono has a phase problem, not an EQ problem, so fix that before shaping the tone further.
If you are also weighing how wide to spread the whole kit, should drums be mono or stereo walks through the element-by-element call.
What frequency adds air to cymbals?
Air and sparkle live up top.
A boost around 8–10 kHz brings out cymbal sheen and helps the overheads cut, while a gentle high shelf above 12 kHz adds open, airy sparkle to the whole kit.
Keep both subtle and add them only after taming the 2–5 kHz harshness, otherwise the boost just amplifies the harsh frequencies and makes the cymbals fatiguing.
The Bottom Line
Great overhead EQ starts before the EQ. Fix the phase, then decide whether the overheads are the whole kit or just cymbals, and set the high-pass to match.
Cut the 2–5 kHz harshness, add a touch of shimmer and air on top, and remember the recording sets the ceiling.
Do that, and the overheads glue the kit together with sparkle instead of harshness and mud.
Overhead EQ is the piece that ties the whole kit together.
The cut-before-boost order and the dynamic-EQ move are part of the broader technique covered in the complete EQ guide.
The way the overheads sit inside the rest of the kit is the mixing drums story.
Get the phase right, decide the job, cut the harshness, and the overheads finally sound like the glue they are supposed to be.