Your snare hits hard in the room but lands flat in the mix. Soloed it sounds fine, then the track plays and it is boxy, buried, and gutless, with no crack and no body.
So you boost the highs for snap, the lows for weight, and now it is harsh AND boomy and still does not cut.
The snare is the backbone of the groove, and right now it is doing nothing.
A great snare is mostly a few targeted EQ moves, done in the right order, on a drum that was set up right first.
Below is that method in order: check phase and tuning, cut the boxiness, boost body, crack, and snap, then balance the top and bottom mics.
Get the sequence right, and the snare cracks through every mix.
TL;DR
- Fix phase and tuning first. EQ cannot rescue a snare with phase problems or bad tuning.
- High-pass around 80–120 Hz to clear rumble without thinning the fundamental.
- Boost 150–250 Hz for body and weight.
- Cut 400–800 Hz to kill boxiness and ring.
- Boost 2–5 kHz for crack and 8–12 kHz for snap.
The cheat sheet is next, then the method in full, from the phase check to the top-and-bottom mic blend.
Snare EQ Cheat Sheet
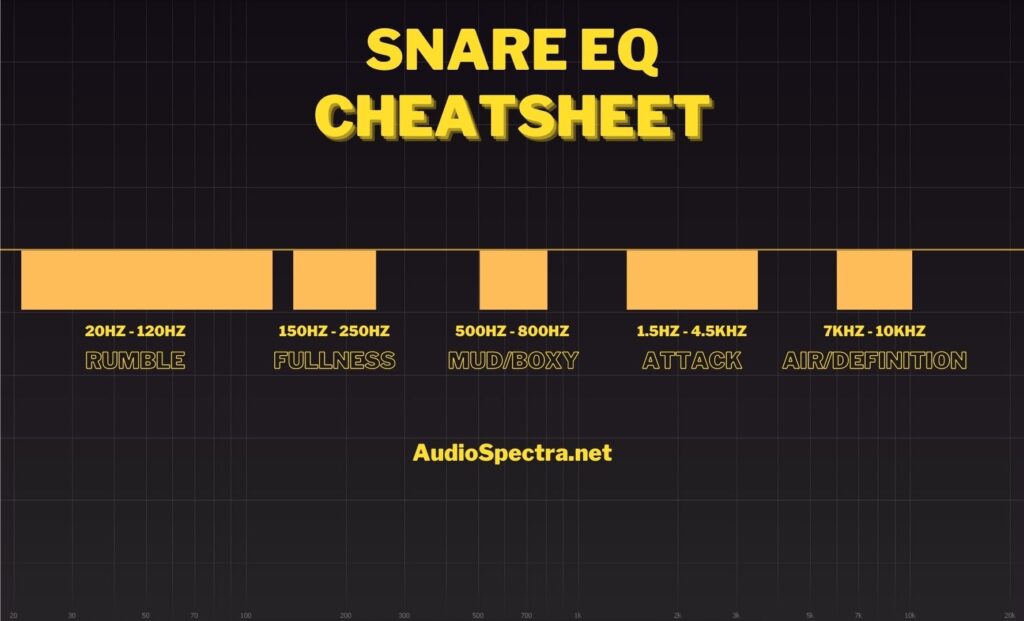
Here are the key snare frequencies in one place.
Treat them as starting points and sweep to find the exact spot, since they shift with the drum, the tuning, and the head.
For all the drums at a glance, the drum EQ cheat sheet covers the whole kit.
The rack toms share the snare’s 150–250 Hz body, and how to EQ toms handles their side.
| Frequency | What lives there | Move |
|---|---|---|
| 80–120 Hz | Rumble, low bleed | High-pass to clean up |
| 150–250 Hz | Body, weight, fatness | Boost for a fuller snare |
| 400–800 Hz | Boxiness, ring, honk | Cut to open it up |
| 800 Hz–1 kHz | Roundness vs ring | Boost for round, cut to tame ring |
| 2–5 kHz | Crack, attack, presence | Boost to cut through |
| 8–12 kHz | Snap, wire detail, air | Boost for snap and sheen |
Fix Phase and Tuning Before You EQ
The biggest snare improvements often happen before EQ.
If you recorded with a top and bottom mic, the two are usually out of phase, since they point at opposite sides of the drum.
Flipping the polarity on the bottom mic can transform the body and weight of the snare in one click, doing more than any EQ move.
Tuning matters just as much.
A snare with an uncontrolled ring or a dead, choked tone is a tuning problem, not an EQ problem, and EQ only masks it.
Tune the drum or use light dampening to get the fundamental and the ring under control first.
Then EQ shapes a snare that already sounds good, instead of fighting one that does not.
Subtractive EQ: Cut the Boxiness
Most snares are boxy before they are anything else, so cutting comes first.
The hollow, cardboard quality and the ringing overtones both live in the low mids, and clearing them is what lets the body and crack come through.
This is where the snare opens up.
- High-pass 80–120 Hz: clear rumble and low-end bleed without thinning the fundamental.
- Cut 400–800 Hz: sweep to find the boxiest spot and dip it a few dB.
- Tame ring near 800 Hz–1 kHz: a narrow cut controls an obvious ringing note if tuning did not fully fix it.
Keep the boxiness cut fairly narrow so you are removing the problem, not draining the body.
A snare that sounds open and clear after subtractive EQ needs far less boosting afterward.
Additive EQ: Body, Crack, and Snap
With the snare clean, three boosts give it character.
Body sits low, crack sits in the mids, and snap sits up top, and a snare that cuts usually needs a little of each.
Boost broadly and musically rather than with narrow spikes.
- Body, 150–250 Hz: boost for weight and fatness, especially on thin or modern samples.
- Crack, 2–5 kHz: boost for the stick-on-skin attack that lets the snare cut through a dense mix.
- Snap, 8–12 kHz: boost for the wire detail and the bright snap on top.
If you keep adding crack and it still does not cut, the problem is usually masking from other midrange sources, not a lack of boost.
Carve space in the mix rather than pushing the snare harder.
Top and Bottom Snare Mics
When you have a top and bottom mic, EQ them for different jobs rather than identically.
The top mic carries the body and the stick attack, while the bottom mic captures the wires and the snap.
Treating each for its strength gives you the most control over the final sound.
EQ the top mic for body and crack, and high-pass the bottom mic aggressively so it adds wire snap without piling up low-end mud.
Blend the two to taste, more bottom for a wiry, modern snare and more top for a fat, punchy one.
Always confirm the polarity is right, since the blend only works when the two mics are in phase.
Carve Space for the Snare in the Mix
A snare rarely lives alone in the midrange.
Vocals, guitars, and synths all compete for the 2–5 kHz crack zone, so the final EQ calls happen in context, not in solo.
The goal is to give the snare a clear lane without making everything else harsh.
If the snare and a guitar fight, a small dip in the guitar around the snare’s crack frequency opens a pocket for it.
It is the same complementary-EQ idea that keeps the kick and bass apart.
The snare’s snap boost at 8–12 kHz also lifts hi-hat bleed, so how to EQ hi-hats is the companion for keeping the top of the kit clean.
Make the snare’s presence boost and any competing cuts with the full mix playing, since that interaction is what the listener hears.
3 Common Mistakes
A few habits keep a snare from ever cutting through. Avoid these and the moves above land.
1. EQing before fixing phase and tuning. No EQ rescues a snare with a polarity problem or an uncontrolled ring.
Flip the bottom mic and tune the drum first, then shape what is left.
2. Boosting crack instead of cutting boxiness. A buried snare is usually boxy, not short on highs.
Cut the 400–800 Hz mud first, and the crack you already have suddenly comes forward.
3. Making every call in solo. A snare that sounds huge alone often clashes with the vocal and guitars.
Set the broad strokes quickly, then finalize the EQ in the full mix.
Frequently Asked Questions
Six quick answers to the snare-EQ questions that come up most: frequencies, mic pairs, and where EQ sits in the chain.
What frequency do snare drums snap at?
Snare snap and wire detail live up high, usually 8–12 kHz, while the crack and attack of the stick sit lower at 2–5 kHz.
Boost 8–12 kHz for the bright snap on top and 2–5 kHz for the presence that cuts through a mix.
If the snap sounds harsh rather than crisp, ease the boost or use a wider, gentler shape so it sounds natural.
What frequency makes a snare fat?
Snare body and fatness live around 150–250 Hz.
A boost there adds weight and warmth, especially on thin or modern samples that lack low-end character.
Pair it with a cut around 400–800 Hz to remove the boxiness that often comes with a fuller snare, so you get fatness without mud.
High-pass below 80–120 Hz to keep the low end controlled.
How do you cut boxiness out of a snare?
Boxiness sits in the low mids, usually 400–800 Hz.
Sweep a narrow boost through that range to find the most hollow, cardboard-sounding spot, then cut a few dB right there.
A separate narrow cut near 800 Hz to 1 kHz tames an obvious ringing note. Keep the cuts fairly tight so you remove the box without draining the body the snare needs.
Should you EQ the top and bottom snare mics differently?
Yes. The top mic carries the body and stick attack, so EQ it for weight and crack.
The bottom mic captures the wires, so high-pass it firmly and use it for snap and detail rather than low end.
Blend the two to taste, and always check the polarity, since the top and bottom mics are usually out of phase and need the bottom flipped to sound right.
Should you EQ a snare in solo or in the mix?
Mostly in the mix.
Soloing helps you find a specific boxy frequency to cut, but a snare that sounds great alone often clashes with the vocal and guitars in the crowded 2–5 kHz range.
Set the broad moves quickly, then make the final presence and body decisions with the full track playing, since the snare’s job is to cut through that mix.
Do you EQ or compress a snare first?
Usually EQ first, at least for the corrective cuts.
Clear the boxiness and fix phase and tuning, then compress to control dynamics and add sustain or punch.
Many engineers then add a second touch of EQ after compression to fine-tune the tone, since compression changes the balance.
Treat EQ and compression as partners, with subtractive EQ leading the chain. The compressor side, with settings by goal, is in snare compression settings.
The Bottom Line
A snare that cuts is built from a clear order.
Fix phase and tuning, high-pass the rumble, cut the 400–800 Hz boxiness, then boost the 150–250 Hz body, the 2–5 kHz crack, and the 8–12 kHz snap.
Balance the top and bottom mics, and make the final calls in the full mix. Get those right and the snare anchors the groove instead of disappearing into it.
Snare EQ is one instrument’s worth of a much larger skill.
The complete EQ guide is where the same cut-then-boost logic gets applied to every other source in the mix.