You have your levels set. The vocal sits where you want it. The drums are punching. The bass is solid.
Then you reach for the pan knobs, and the mix starts to fall apart. The hi-hat went too far left.
The acoustic guitar is now buried because it is fighting the lead guitar at the same pan position.
The keys are competing with the vocal for center stage. You undo every pan move and put it all back to center.
Panning is not a guessing game. There is a simple rule that handles 90 percent of decisions and a short list of exceptions for the rest.
The cheat sheet below puts every common instrument in the right place from the first knob turn.
This is the table you want to keep open in every mix.
The pan position for every common instrument, the reason behind each placement, and the exceptions that come up by genre.
Use it as a quick reference here, or follow how to pan instruments in a mix when you want the same decisions walked through in mix order rather than looked up.
TL;DR: The Rule in 30 Seconds
The shortest version of the rule. Most pan decisions come from a single principle and a handful of exceptions.
- Low frequencies and lead transients stay center. Kick, bass, snare, lead vocal.
- High frequencies and ambient sources spread. Cymbals, overheads, room mics, reverb returns.
- Doubled or paired sources hard-pan opposite each other. Stereo guitars, doubled vocals, percussion pairs.
- Mono sources fill the gaps between centered and hard-panned elements. Keys, single guitars, perc, BGVs.
- Match drum close-mic pans to the overhead image. Toms and hats across the panorama.
- Reference the genre. Hip-hop and pop run tighter; rock and indie run wider.
The Panning Cheat Sheet
The master placement table for every common instrument.
Pan positions are expressed as percentages off center, with negative values indicating left and positive values right.
Use these as defaults and adjust by genre and arrangement density.
| Instrument | Pan position | Reasoning | Exception |
|---|---|---|---|
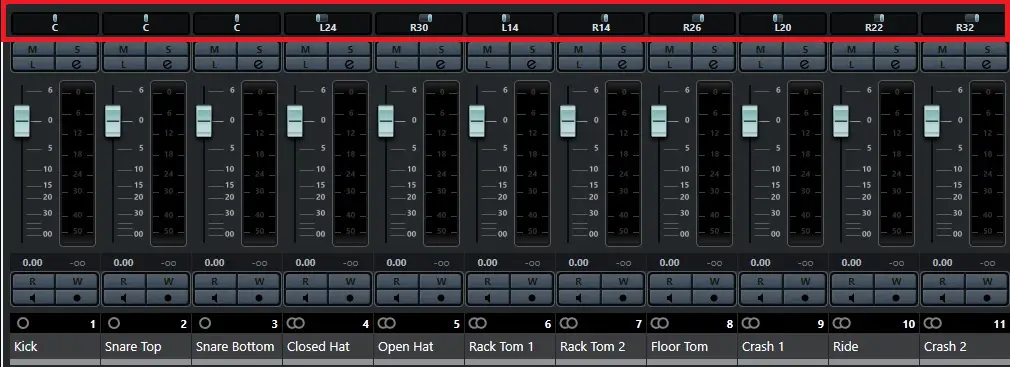
| Kick drum | Center | Sub-frequencies are non-directional; speaker mass for impact | None worth taking |
| Snare drum | Center | Backbeat anchor; listener tracks like lead vocal | None — use stereo reverb on a send for width |
| Hi-hat | 15–30% L or R | Single-source mono close mic; matches overhead image | Programmed trap hats spread across stereo field |
| Rack toms | 20–40% (spread across) | Mono close mics; image built through panning | Match each tom to overhead position |
| Floor tom | 30–40% opposite side | Mono close mic on the far edge of the kit | Drummer or audience perspective; pick one |
| Overheads | LCR (100/100) or 80/80 | Stereo pair; carries the kit’s spatial image | Narrow for tighter modern productions |
| Bass guitar / 808 | Center | Low-frequency content non-directional below 100 Hz | None — never pan |
| Lead vocal | Center | The most important source in the mix; the song’s voice | Stereo reverb / delay on sends for width |
| Doubled vocals | 40–80% L and R (hard pair) | Two takes that sit opposite to thicken the lead | — |
| Background vocals (BGVs) | Spread around the lead | Fill the stereo field around the centered lead | Modern pop often uses doubled BGV pairs |
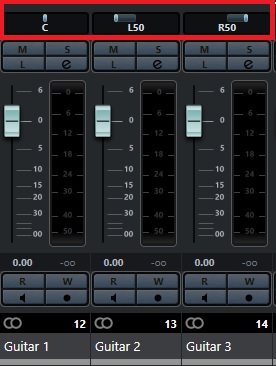
| Rhythm guitars (doubled) | Hard pan 80–100% L and R | Two performances spread across the field | Single rhythm guitar centered or 30% off |
| Lead / solo guitar | Center to 20% off | Soloist takes a forward position | Pan slightly to avoid the vocal axis |
| Acoustic guitar (rhythm) | 30–50% L or R | Off center to create space; pair with mono synth or piano | Centered for solo acoustic productions |
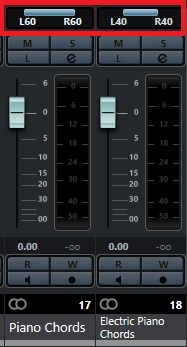
| Piano (rhythm / backing) | Stereo wide or 20–40% off center | Captures the natural keyboard spread | Centered for lead piano features |
| Electric piano / Rhodes | 20–40% off center | Sits behind the vocal without competing | — |
| Synth pads | Stereo wide | Atmosphere; fills the stereo field | Mono for tight modern productions |
| Synth leads | Center or slight off | Lead voice when used as a solo instrument | — |
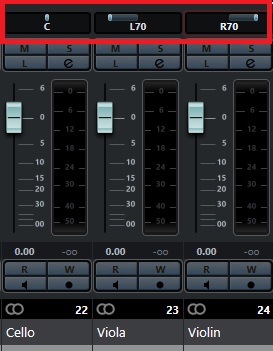
| Strings (section) | Stereo wide or section-specific spread | Orchestral seating dictates per-section placement | — |
| Brass section | Stereo or spread 20–40% | Tight pair or wider depending on arrangement | Solo brass centered |
| Shakers / tambourine | 30–60% L or R | High-frequency content carries placement well | Pair off-axis from kit hats |
| Percussion (single) | 30–80% L or R | Adds movement; balance opposite a paired element | — |
| Reverb / delay returns | Stereo wide | Width and depth from dry-mono / wet-stereo contrast | Mono reverb for vintage or tight productions |
How to Pan Drums
Drums need the most pan attention of any element because the kit has the most mics and the most potential for cohesion problems.
The rule is to treat the kit as one instrument and pan the close mics to match where each drum sits in the overhead picture.
Kick and snare stay dead center. Low frequencies and the backbeat anchor lose impact when panned off-axis.
Hard-panned overheads (LCR) give a wide modern image; narrower (80/80 or 70/70) gives a tighter focused kit.
Toms span the panorama with each close mic matched to its overhead position. Hi-hat sits 15–30 percent off-center on the same side it appears in the overheads.
The full kit treatment plus the genre-specific exceptions live in the complete drums mixing guide.
The mono-versus-stereo decision per element (when to spread, when to center, when to use stereo only in effects) is broken out in should drums be mono or stereo.
How to Pan Guitars
Guitar panning depends on whether the part is doubled.
Single guitars sit center or slightly off; doubled performances hard-pan opposite each other to create a wide, thick stereo image.
Two identical rhythm guitar takes hard-panned 80–100 percent left and right give the classic rock and metal wall.
A single rhythm guitar centered or panned 30 percent off gives a tighter, focused sound.
Lead and solo guitars usually sit center or slightly off so they take the front of the mix.
Acoustic rhythm guitars work best at 30–50 percent off center, leaving the center for vocals and the opposite side free for a paired source.
If two takes of the same part exist, hard-pan them. If only one take exists, decide whether the guitar is foreground (center) or background (off-center).
Avoid stereo-widening plugins on mono guitars; the artificial width collapses on mono playback and creates phase issues.
How to Pan Piano, Keys, and Synths
Keyboard panning depends on the role and the recording. A stereo piano recording (or sample) can spread wide and add stereo information across the mix.
A mono keyboard part needs deliberate placement to fit into the panorama.
Backing piano works at 20–40 percent off center, leaving the center for the vocal and the opposite side for another mono source like an acoustic guitar.
Electric piano or Rhodes typically sits 20–40 percent off, often opposite the acoustic guitar for stereo balance.
Synth pads spread stereo wide as atmospheric layers behind everything else. Synth leads centered when they function as the lead voice; off-center when supporting.
Watch the bass content on synth pads.
Pads that reach below 150 Hz should be high-passed before going wide stereo; the low-end content needs to stay mono for translation.
Stereo wide above 150 Hz, mono below.
How to Pan Strings and Orchestral Sections
Strings and orchestral parts have established conventions based on actual seating positions in a concert hall.
Following the convention gives the listener an immediately familiar spatial image; ignoring it creates a sense of unrealism.
Traditional orchestral seating places first violins 30–50 percent left, second violins center to 20 percent left, violas at center, cellos 20–40 percent right, basses 40 percent right.
The full breakdown of orchestral and pop-string panning is in mixing strings.
For pop and rock string arrangements (which usually use stereo string sample libraries), the conventions matter less because the sample is already a stereo blend.
Run the strings stereo wide and trust the source’s internal balance. Mono string parts (a single cello solo, a violin lead) sit center or slightly off.
How to Pan Vocals and Backing Vocals
Vocal panning is the simplest decision in the mix. The lead vocal stays dead center. Everything else builds around it.
Doubled lead vocals (a second take of the lead, often called a double) hard-pan 40–80 percent left and right.
The dry lead stays center; the doubles widen and thicken without pulling the lead off-axis.
Background vocal stacks spread around the lead, with harmonies in the same parts panned together (e.g., a third-up harmony at 40 percent left, a fifth-up at 40 percent right).
The full vocal panning treatment with arrangement-specific approaches is in how to pan vocals.
For width on the lead without panning the dry signal, use a stereo reverb or delay on a send. The dry vocal stays centered; the wet returns open across the field.
This is how modern pop gets a wide vocal sound without the lead feeling lopsided. The full vocal chain context is in the complete vocal mixing guide.
How to Pan Percussion and Effects
Percussion and special effects fill the spaces between the main elements.
Their job is movement and texture, not foundation. Panning them off-axis gives them their own home in the panorama.
Shakers and tambourine sit 30–60 percent off center, often paired with another percussion element on the opposite side.
Single percussion hits (claps, snaps, sticks) can pan more aggressively (60–80 percent) because they are short-duration events that the ear places quickly.
Pair-balance them: if one perc element sits at 60 percent left, find another at 60 percent right.
For deeper mechanics on why low-frequency content has to stay mono regardless of which percussion or effect you are placing, the mono vs stereo guide covers the physics.
Effects (filtered sweeps, risers, atmospheric textures) work best as stereo elements that fill width behind the dry mix.
3 Common Mistakes to Avoid
Three mistakes account for most pan decisions that almost work. Each has a clean fix from the rule above.
- 1. Panning the kick, bass, or lead vocal off center. Low-frequency sources lose impact off-axis and the lead vocal loses its anchor role. These three live in the center, every mix, every genre.
- 2. Mismatched drum close-mic and overhead pans. When the snare close mic is centered but the snare sits at 20 percent right in the overheads, the snare hits arrive at two different stereo positions. Match the close mic to the overhead position.
- 3. Stereo-widening a mono source. Stereo wideners on guitars, vocals, or snares create artificial width that vanishes on mono playback and introduces phase issues. Build width by panning multiple mono sources or by adding stereo effects on sends.
Frequently Asked Questions
Short answers to the questions that come up most often about instrument panning.
Where should the kick, bass, and lead vocal be panned?
Dead center, always. The kick and bass occupy low frequencies that are non-directional.
Panning them off-axis wastes the impact on width nobody can hear, while also halving the speaker mass behind the low end.
The lead vocal sits center because the listener tracks it as the song’s voice; any offset reads as a mix error.
How wide should overheads be panned?
Either hard-panned LCR (100 left, 100 right) for a wide modern image or narrower at 80/80 or 70/70 for a tighter, more focused kit.
Both work; the choice is genre and taste.
Modern pop and rock favor LCR for the widest kit; hip-hop, jazz, and indie often run narrower for a more centered drum sound.
Should I hard-pan guitars?
If you have two doubled performances of the same guitar part, hard-pan them 80–100 percent left and right.
If you have a single performance, do not hard-pan it; either keep it center for foreground or 30 percent off for background placement.
Doubling is what enables the hard-panned wall sound that defines rock and metal.
Where should background vocals be panned?
Spread BGVs around the lead vocal so they fill the stereo field without competing for the center.
Common arrangement: harmonies in the same parts panned together (a third-up harmony at 40 percent left, a fifth-up at 40 percent right).
Modern pop often uses doubled BGV pairs, where two takes of the same harmony hard-pan opposite each other.
Does panning affect mono compatibility?
Yes. Sources panned off-axis lose level when summed to mono (a hard-panned guitar drops 3 dB in mono).
Stereo-widening plugins are the worst offenders; their artificial width often cancels entirely on mono playback.
Always check your mix in mono before committing pan decisions. Phones, Bluetooth speakers, and club sub feeds all sum to mono in different ways.
Drummer’s perspective or audience perspective for drum panning?
Either works; just pick one and commit.
Drummer’s perspective places the hi-hat on the right (the drummer’s left hand) and the floor tom on the right.
Audience perspective places the hi-hat on the left and the floor tom on the left. Match every drum close mic to the same perspective consistently.
Mixing perspectives across the kit creates a confusing spatial image.
The Bottom Line
The panning rule is simple.
Low frequencies and lead transients stay center. Cymbals, room mics, and wide stereo sources carry the image.
Doubled performances spread opposite each other.
Mono sources fill the gaps. Apply this to every common instrument, and the pan decisions stop feeling like guesses.
A lookup table only gets you to a solid default.
Once the placements feel automatic, the moves that turn a flat stereo image into a three-dimensional one (front-to-back depth, complementary panning, auto panning) are covered in audio panning secrets.
And none of it lands if the levels underneath are off, so lock your gain staging first and the placements come together fast.
This makes sense I’ll definitely try it.
Awesome. I wish you all the best and feel free to reach out if you get stuck or need help.
Thank you for this wonderful tips on panning. I have one question; you talked about finding other sounds to complement each other when panning, how can someone do that? Do you repeat the same midi information from the other instrument that was planned to the other side or you play totally a different thing?
Hi, it’s much better to play a totally different thing. Playing the same thing twice usually creates unnecessary clutter or thickness. For instance, you can have a hi-hat on the right and have a shaker on the left playing a different pattern. I hope that answers your question.