You finish a mix that sounds enormous in your headphones.
The cymbals stretch from ear to ear, the guitars feel like they are 12 feet apart, and the keyboards float somewhere behind everything.
Then you play it through your phone speaker. The whole image collapses into the middle.
Half the elements vanish. The wide, three-dimensional mix you spent hours on now sounds like a one-foot box.
Panning is the part of mixing where most beginners get the most surprising failures.
The decisions look simple (pan knob, left or right, how far), but the consequences ripple through every other stage of the mix and across every playback system the listener might use.
Get the panning right, and the mix translates everywhere. Get it wrong, and no plugin chain rescues it.
This is the complete guide to panning.
The foundation, the 6-step workflow, the per-instrument placements, mono-safe width techniques, the advanced moves, the front-to-back dimension, and a master cheat sheet that ties everything together.
Every sub-topic links out to the dedicated post for when you want to go deeper.
TL;DR: How This Guide Works
The guide moves from foundation to workflow to advanced techniques.
Read it top to bottom for the full picture, or jump to the section for the panning problem you are stuck on.
- Foundation: levels first, mono compatibility second, then placement.
- Workflow: the 6-step process from center-everything to mono check.
- Placements: where every common instrument sits in the stereo field.
- Width: how to build stereo width that survives mono playback.
- Advanced: LCR, Haas effect, microshifting, Mid/Side, auto-panning.
- Depth: the front-to-back dimension that adds three-dimensionality.
- Cheat sheet + FAQ: the at-a-glance reference and answers to the highest-level questions.
The Foundation: Levels, Mono Compatibility, and the Center
Panning decisions only work when the foundation underneath them is solid.
Two stages have to be set before you reach for the pan knobs: levels and mono compatibility.
Clean levels mean plugins behave the way their designers intended, and each channel feeds the bus at a predictable target.
The full level management discipline is covered in gain staging.
Without it, every pan decision sits on top of inconsistent gain structure that fights you downstream.
Mono compatibility is the second foundation.
The mix needs to translate to mono playback (phones, Bluetooth speakers, club PAs summed for the subwoofer feed).
The conceptual breakdown of what changes when stereo sums to mono is in mono vs stereo.
The pan workflow below treats mono-check as a non-negotiable step, not an optional polish.
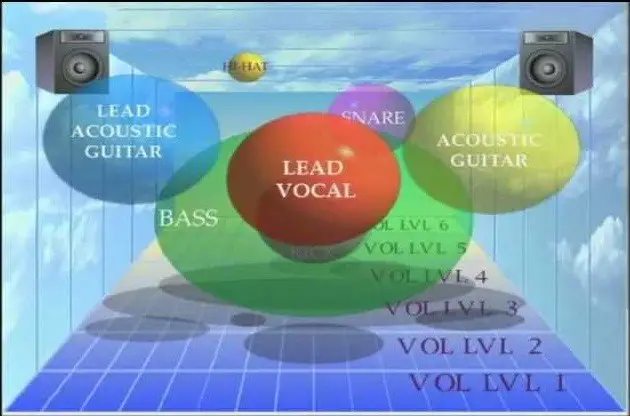
The third foundation is the center anchor. Four elements stay dead center in almost every modern mix: kick, bass, snare, and lead vocal.
These are the rhythmic and melodic anchors the listener tracks as the song’s foundation. Everything else builds around them.
The Six-Step Panning Workflow
Every mix runs the same six panning steps in the same order.
The order is what keeps the decisions small and the mix balanced.
- 1. Center everything. Pan all tracks to 0 to hear the raw level balance.
- 2. Anchor the center. Lock kick, bass, snare, lead vocal at 0.
- 3. Pan the drum kit. Match close mics to overhead position; commit to drummer’s or audience’s perspective.
- 4. Place guitars and doubled sources. Hard-pan doubled performances; offset single sources.
- 5. Position keys, strings, pads, and BGVs. Fill the gaps between centered anchors and hard-panned doubles.
- 6. Check in mono and adjust. Toggle mono utility; fix what disappears or jumps.
The full step-by-step walkthrough with starter percentages and listening cues lives in how to pan instruments in a mix.
The rest of this pillar covers what happens at each step in deeper context.
Where Every Instrument Sits
Once the workflow is running, the per-instrument placement decisions follow a small set of rules. Low frequencies and lead transients stay center.
Cymbals and room mics carry the stereo image. Doubled performances spread hard. Mono sources fill the gaps.
The instrument panning cheat sheet is the master single-page reference.
It covers every common source on one chart: drums, bass, vocals, doubled vocals, BGVs, rhythm guitars, lead guitar, acoustic guitar, piano, electric piano, synth pads, synth leads, strings, brass, shakers, percussion, and reverb returns.
Keep it open during sessions and override only when the genre gives you a specific reason.
Two element-specific deep dives apply across the cluster.
Vocal panning (lead, doubles, BGV harmonies, stereo effects on sends) is covered in how to pan vocals.
Drum kit panning with the close-mic-to-overhead matching is covered in should drums be mono or stereo, with the full kit context in the complete drums mixing guide.
Building Width That Translates
Stereo width comes from three real sources:
- Panning multiple mono sources across the field
- Doubling performances and hard-panning the pair
- Stereo recordings or stereo effects on aux sends.
These are the techniques that build width while surviving mono playback.
The wrong way to build width is to use stereo wideners or phase-flip tricks on mono sources.
These create artificial width in stereo that often collapses entirely in mono. The result is a mix that sounds huge on monitors and weak on phones.
The full breakdown of width-that-survives-mono techniques, including Mid/Side processing for surgical control, is in mixing in stereo.
The simple rule: if width does not come from real source differences, it will not survive mono. Doubled takes have natural variation.
Multiple panned mono sources have separate placements. Stereo recordings have captured spatial information.
Each one collapses to mono cleanly because the underlying signal data is intact when the channels sum.
Advanced Techniques: LCR, Haas, Microshifting, and Mid/Side
Beyond the basic workflow, a handful of advanced panning techniques solve specific problems.
Each one has a place in a modern mix; none of them is a default to apply everywhere.
LCR panning (Left-Center-Right). Every track sits at exactly one of three positions: 100 percent left, dead center, or 100 percent right.
No middle positions. The technique creates a dense, focused mix with maximum clarity and minimum masking.
Used by Andrew Scheps and other engineers for arrangements with many doubled parts. Works best when you have plenty of doubled performances to balance the hard pans.
Haas effect. Duplicate a mono source, delay one copy by 10–30 ms, and hard-pan the pair.
The ear perceives the delayed copy as coming from the panned side while the original anchors center.
Creates wide stereo width from a single mono source.
Use with caution: the technique introduces phase relationships that can partially cancel in mono, so always check.
Microshifting. Like the Haas effect but with a small pitch shift (5–10 cents) instead of (or alongside) a delay.
The detuned copy creates the perception of two slightly different performances, giving you double-tracked width from a single take.
Soundtoys MicroShift is the popular plugin. Less mono-cancellation risk than pure Haas.
Auto-panning. A plugin or automation that moves a source across the stereo field rhythmically (tempo-synced) or freely (LFO-based).
Used as ear candy on synths, percussion, and effects to add motion. Best in small doses; full-time auto-panning on a primary element exhausts the listener fast.
Mid/Side rotation. Using Mid/Side processing to adjust the relative levels and EQ of the center (mid) and side content.
High-passing the side channel forces the low end mono; boosting the side above 8 kHz adds air and width to cymbals without affecting the center.
A precision tool; apply where surgical width adjustment is needed and leave the rest of the chain in regular stereo mode.
Front-to-Back Depth and the Three-Dimensional Mix
Panning gets discussed as left-to-right placement, but a finished mix has three dimensions, not two.
The third dimension is depth: how far in front of or behind the listener each element sits.
Depth comes from level balance, reverb amount, EQ shape, and pre-delay timing on send effects.
Loud, dry, full-frequency elements sit forward (close to the listener).
Quieter elements with more reverb, less high-frequency content, and longer pre-delays sit further back.
The lead vocal sits front and center. Background vocals sit slightly back. The drum kit usually sits at medium depth. Reverbs and atmospheric pads sit deep in the background.
Mid/Side processing also affects depth.
Compressing the mid-channel more than the sides locks the centered elements forward while leaving the side content breathing.
Cutting high frequencies on background elements pushes them back.
The mastering-stage tools that finalize this dimensional balance are covered in the complete mastering guide.
Master Panning Cheat Sheet
The cluster-wide reference table.
Use this to navigate panning techniques by goal and to spot the common watch-outs before they appear in the mix.
| Technique | Purpose | Use case | Watch out for |
|---|---|---|---|
| Center anchor | Foundation | Kick, bass, snare, lead vocal | Never pan these off-axis |
| Hard-panned doubles | Real stereo width | Rhythm guitars, BGV harmonies, hooks | Requires two performances; single takes need offset only |
| Multiple mono sources spread | Stereo image | Drum kit close mics, perc, single instruments | Keep rough left-right symmetry |
| Stereo effects on sends | Width on mono dry signal | Vocal reverb, snare plate, atmospheric delay | EQ the return to avoid mud |
| LCR panning | Dense, clear arrangement | Many-track mixes with doubled parts | Needs balanced pairs on both sides |
| Haas effect | Width from one mono source | Synth leads, guitar overdubs | Phase cancellation risk in mono |
| Microshifting | Pseudo-doubling | Vocals, leads, single-take parts | Subtle drive (5–10 cents); over-applied sounds unnatural |
| Auto-panning | Movement and motion | Synths, percussion, ear candy | Fatiguing on primary elements; use sparingly |
| Mid/Side processing | Surgical stereo control | Force LF mono, boost side air | Not a default; precision tool only |
| Front-to-back depth | 3D dimensionality | Lead vs background hierarchy | Controlled by level, reverb, EQ, pre-delay |
3 Common Mistakes to Avoid
Three mistakes account for most beginner mixes that sound wide in stereo and weak elsewhere.
Each one has a clean fix.
- 1. Panning the center anchors off-axis. Kick, bass, snare, and lead vocal stay at 0. Panning any of them off-center pulls the mix off-balance and loses impact on low-end content. The four anchors are non-negotiable.
- 2. Hard-panning single sources. Hard pans only work in pairs. A single guitar at 80 percent left with nothing balancing on the right pulls the mix to one side. Either find a second performance to hard-pan opposite, or sit the single source at center or 30 percent off.
- 3. Skipping the mono check. A mix that has not been checked in mono will surprise you on phones and Bluetooth speakers. Toggle a mono utility on the master every 10 to 15 minutes during the session. The final check before mastering is mandatory.
Frequently Asked Questions
Short answers to the highest-level questions about audio panning across every mix scenario.
Should low-end sounds always stay in the center?
Yes. Low frequencies below roughly 100 Hz are non-directional, so panning kick, bass, sub, or any low-end content off-axis wastes the impact on width the ear cannot perceive.
Centering also keeps the full speaker mass behind the low end and protects against phase cancellation when the mix sums to mono.
There is no genre or arrangement where panning the bass or kick off-center is the right call.
What is the fastest way to improve stereo balance?
Count what sits on each side of the mix and aim for rough symmetry. If three guitars sit at the left and only a shaker at the right, the mix is lopsided.
Move a source, double a take to balance, or rebalance levels so the perceived weight matches on both sides.
The center anchors hold the middle; the sides need balanced content.
When should I use LCR panning?
LCR panning works best in arrangements with many doubled parts that can balance hard pans on both sides (rock, metal, dense pop).
Every track sits at exactly one of three positions: 100 percent left, center, or 100 percent right. The technique creates a dense, focused mix with maximum clarity.
Sparse arrangements or songs without doubled performances usually benefit more from a wider range of pan positions.
Is the Haas effect safe to use?
The Haas effect introduces phase relationships that can partially cancel when the mix sums to mono.
Use it sparingly and always check in mono after applying it.
Microshifting (a small pitch shift instead of a delay) achieves a similar pseudo-stereo effect with less mono-cancellation risk and is often the safer choice on lead vocals and primary instruments.
How wide should a stereo mix be?
Wide enough to feel three-dimensional but not so wide that the mix feels lopsided or empty in the center.
A rule of thumb: if reducing the overall stereo width by 15 to 20 percent on the master makes the mix translate better in mono without obviously narrowing the stereo image, it was too wide.
Reference against commercial tracks in the same genre; modern pop and rock run wide, hip-hop and trap often run tighter.
What is the difference between panning and stereo width?
Panning places individual sources at specific positions in the stereo field. Stereo width is the overall sense of how wide the mix feels from left to right.
Panning is the tool that builds width, but width also depends on other factors. How many sources sit off-axis.
How doubled performances balance. How stereo effects on sends spread. How Mid/Side processing shapes the side content separately from the center.
The Bottom Line
Panning is not a guessing game. It is a workflow built on a foundation of clean levels, mono compatibility, and locked center anchors.
Run the six steps in order, place each source according to the cluster-wide rules, build width from real source differences, and check in mono regularly.
The advanced techniques (LCR, Haas, microshifting, Mid/Side, auto-panning) are tools to reach for when the basics are working; they are not shortcuts past the basics.
Use this guide as the cluster-wide map.
The spokes go deeper on every sub-topic: vocal panning context, drum panning context, the mono-compatibility safety net, and the level foundation that makes every spatial decision predictable.
The whole cluster reads together as one workflow; this pillar’s job is to keep the parts visible.