You watch a tutorial where the engineer says “listen to how the snare gets tighter when I bring the threshold down.”
You bypass the plugin. You enable it. You bypass it again. You still can’t tell what changed.
Five years into mixing and the compressor still feels like the most invisible plugin in your chain.
The problem isn’t your ears. It’s that compression doesn’t change tone (mostly), it changes shape.
And until someone tells you what shape changes to listen for, your brain just hears “louder” when the compressor is on.
This is a five-step training walkthrough.
Each step isolates one specific compressor behavior, gives you a setting designed to make that behavior obvious, and tells you exactly what sound to listen for.
It comes with a daily drill, a cheat sheet, and the skill to A/B-test any compressor and describe what it’s doing in plain words.
TL;DR
- Level-match first. If A is louder than B, A will always sound “better.” Match output gain before you compare.
- Listen for shape changes, not tone changes. Compression changes how a sound starts, sustains, and decays.
- Use exaggerated settings to learn. 10:1 ratio, 8 dB GR, fastest attack. Once you can hear it, dial it back.
- Pick the right source. Drums for attack/release, vocals for sustain, full mix for glue.
- Daily drill: 10 minutes, one source, one parameter at a time.
The five-step framework follows, plus a what-to-listen-for table, the daily ear-training drill that builds the skill fastest, and the three mistakes that keep most producers stuck.
Why Compression Is Hard to Hear at First
Most other plugins change something obvious. An EQ boost at 5 kHz adds sizzle. A reverb adds a tail. A delay adds repeats.
You hear the new ingredient and you know it’s there. Compression doesn’t add anything.
It only takes away dynamic range, which means it changes the relationship between loud and quiet moments in the signal.
That relationship is a shape, not a sound. Your brain isn’t trained to track shape changes the same way it tracks frequency or pitch.
It needs reps with exaggerated settings, with one parameter changing at a time, with the output volume matched perfectly.
Get those three things right, and the shape change pops into focus.
If you want a primer on what the controls actually do before you start the drill, our how to use an audio compressor guide breaks them down.
Mastering engineer Ian Shepherd has written extensively about how perceived loudness fools the ear in this exact context (see his work at Production Advice).
Volume bias is the single biggest reason compression sounds invisible. Solve it once, and the rest of this guide gets dramatically easier.
Step 1: Set Up the Session
Before you can hear what a compressor does, the session has to be set up so that nothing else is changing when you toggle bypass.
Two things matter: the source you choose and the gain matching you do after every settings change.
Pick a loop with strong dynamics. A drum loop with hits and decays. A vocal phrase with loud syllables and quiet ones.
A bass line with notes at different velocities. Avoid heavily processed reference tracks for the drill stage.
You want a raw signal where the compressor has room to actually do something.
Then gain-match every change. Most compressors have a makeup gain knob, and most of them are set above unity by default.
The moment you enable the plugin, the output gets louder. Louder always sounds better.
To remove that bias, dial the makeup gain down until the bypassed and engaged signals hit your meter at the same level.
Only then should you toggle bypass and listen.
Step 2: Hear the Attack
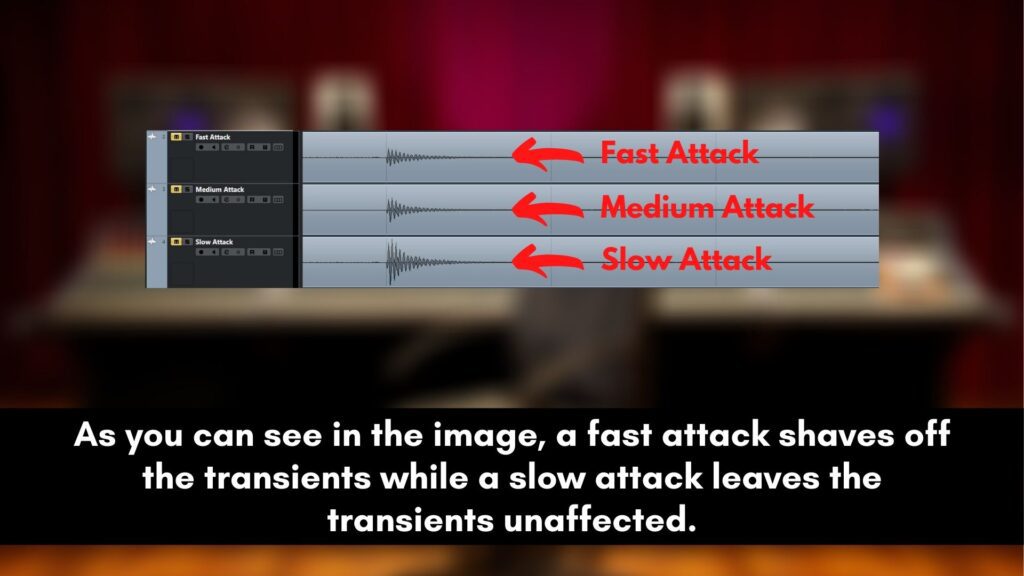
The attack control decides how much of the initial transient escapes the compressor.
It’s the single most audible parameter on percussive sources, and it’s the easiest one to train your ear on first.
Use a drum loop with a clear snare or kick.
Set the ratio to 8:1 (high), the threshold low enough to show 6–8 dB of gain reduction on every hit, and start with the fastest attack on the plugin (typically 0.1–1 ms).
The drum will sound dull and round. The “click” of the stick on the head is gone. Now slowly raise the attack to 30 ms while watching the gain-reduction meter.
The drum gets clickier and more aggressive. The body shrinks. That’s what the attack control sounds like.
The trick is the contrast. A fast attack kills the transient. A slow attack protects it. Toggle between 1 ms and 30 ms at the same threshold and ratio.
The difference is unmistakable. Once you can describe that difference out loud, you’ll hear it everywhere.
Want to see what a compressor is actually doing to your track? Drop your WAV or MP3 into the Compression Analyzer.
Step 3: Hear the Release
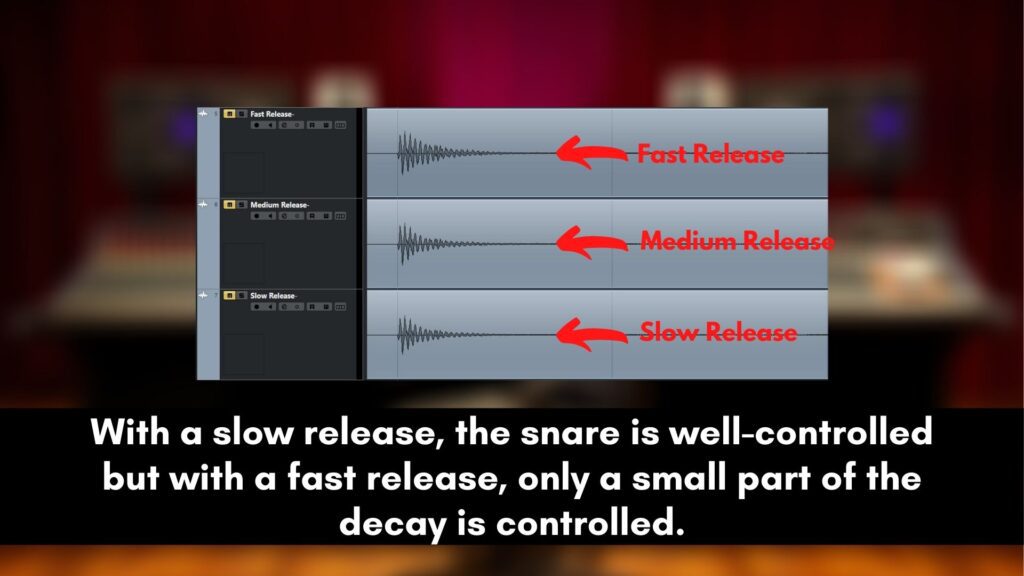
Release tells the compressor how quickly to stop clamping after the signal drops below the threshold.
It’s the parameter that produces “pumping” when set wrong, and it’s the second most audible setting on percussive sources.
On the same drum loop, leave the ratio at 8:1 and the attack medium-fast (5 ms). Start with the longest release on the plugin (500 ms or higher).
The compressor stays clamped between hits, and the loop sounds smushed and small. Now sweep the release down to 30 ms.
At some point you’ll start hearing an audible “lift” between hits, like the kit is breathing in and out in rhythm.
That breathing is the release recovering.
Too short a release on a steady source creates pumping you can hear as a wobble in the floor noise.
Too long a release flattens the dynamics into one continuous sound. Toggle between 30 ms and 500 ms at the same threshold and ratio.
The pump is the release doing its job loudly. Once you can hear pump, you can hear release.
Attack and release are pure shape, and the attack and release settings guide shows where to land them once your ear is trained.
Step 4: How to Hear Compression on Sustained Sounds
Drums make attack and release obvious.
Sustained sources (vocals, bass, pads) make a different compressor behavior obvious: the lift of quiet content up toward the level of loud content.
That lift is what “evens out” a vocal or “fattens” a bass. Pick a vocal phrase with one loud syllable and one quiet one.
Set the ratio to 4:1, the attack to 10 ms, the release to 100 ms, and the threshold low enough to show 4–6 dB of gain reduction on the loud syllable.
Gain match. Toggle bypass. The compressed version will have the loud syllable about the same level (it got clamped) and the quiet syllable noticeably louder than before.
Background room tone will also feel “closer” and “denser.”
That density is the sound of dynamic range shrinking. The dynamic range of the source got smaller.
The quiet parts moved up to meet the loud parts. On a vocal, this is what makes the singer “sit in the mix.”
On a bass, it’s what makes the note tail audible all the way through the bar instead of dropping out.
Step 5: Hear the Ratio
Ratio tells the compressor how aggressively to reduce gain once the signal exceeds the threshold.
It’s the parameter most producers reach for first and the one easiest to misuse. Hearing it cleanly takes a slightly different approach than the other controls.
On a full-mix loop, set the threshold so a 2:1 ratio produces about 2 dB of GR on the loudest sections.
Gain match. Toggle bypass and listen. The mix should sound slightly more cohesive but not obviously processed.
Now raise the ratio to 10:1 without touching the threshold.
You’ll see far more gain reduction on the meter (6–10 dB), and the mix will sound flatter, smaller, and more aggressive.
The instruments that were poking out are now pinned down.
That’s the ratio. Low ratios shape gently. High ratios clamp.
For a longer breakdown of how each ratio band feels, see our compressor ratio explained guide.
The training point here is the A/B: 2:1 vs. 10:1 at the same threshold, gain-matched.
The difference in “size” of the mix is the ratio. That full-mix loop is really mix bus compression, the context where this ear training pays off most.
What to Listen For (Cheat Sheet)
These are the five compressor signals to train into your ears, paired with the symptom you’ll hear and the parameter responsible.
Print this table out, tape it to the wall above your speakers, and refer to it for the first month of practice.
| Signal | What You Hear | Best Source | Control Responsible |
|---|---|---|---|
| Transient kill | Drum hits sound dull and round, “click” disappears | Drum loop | Attack (fast) |
| Transient protect | Click and body both intact, body slightly louder | Drum loop | Attack (slow) |
| Pumping / breathing | Audible “lift” between hits, like the mix is inhaling | Drums or full mix | Release (short) |
| Dynamic lift | Quiet syllables louder, room tone denser, vocal sits | Vocal or bass | Threshold + ratio |
| Flattening | Peaks pinned down, mix sounds smaller and more aggressive | Full mix | Ratio (high) |
Try the meter and the ear together: drop a vocal, a drum loop, or a full mix into the Compression Analyzer →
Daily Ear-Training Drill (10 Minutes)
The framework above only works if you do reps.
Ten minutes a day for four weeks will move you from “I can’t hear compression” to “I can describe what every plugin in this chain is doing.”
The drill is intentionally narrow so you don’t burn out.
- Minutes 1–2: Pick a source. Same loop every day for a week (drum loop on week 1, vocal on week 2, bass on week 3, full mix on week 4).
- Minutes 3–4: Set up the compressor. Default settings. Then 6 dB of gain reduction with exaggerated attack/release for that day’s parameter.
- Minutes 5–7: A/B with gain match. Toggle bypass repeatedly. Say out loud what you hear changing. “The click is gone.” “The room tone got louder.” “The mix is breathing in time with the kick.”
- Minutes 8–9: Dial it back. Pull the exaggerated parameter toward a sensible value. Notice when the effect becomes subtle. The exact moment it disappears is your sensitivity threshold.
- Minute 10: Note what you heard. Write one sentence in a text file. After 28 days you’ll have a journal that shows your ear improving.
One source, one parameter, gain-matched, exaggerated, then dialed back. That’s the whole drill.
The producers who improve fastest are the ones who do this every day for a month, not the ones who watch ten tutorials a week.
3 Common Mistakes
Three problems account for most “I still can’t hear compression” complaints after weeks of practice.
Catching these is usually the difference between staying stuck and breaking through.
- Not gain-matching. This is the number-one reason the compressed signal “sounds better.” It’s not better. It’s louder. Pull the makeup gain down until the meter reads the same with and without the plugin. Then judge.
- Changing two parameters at once. Moving the threshold AND the attack at the same time gives you two variables changing, and your ear can’t isolate either one. Change one knob. Listen. Reset. Change the next knob.
- Practicing on subtle settings. Trying to hear 1 dB of gain reduction before you can hear 8 dB is the equivalent of learning to read by starting with cursive. Start at 6–10 dB GR with exaggerated attack and release. Once you can describe what’s happening at that scale, dial it back.
Ready to stop guessing? The Compression Analyzer will show your mix’s crest factor, tell you which dynamic band it falls into, and recommend the attack, release, and ratio that fit your actual source, not a generic preset. Free, private, runs in your browser.
Frequently Asked Questions
These are the six questions that come up most often when producers start ear training for compression.
Each answer assumes a standard home or project-studio setup with reasonable monitors or headphones.
Why is level matching important when learning compression?
Volume bias is the single biggest reason compression is hard to hear. The human ear interprets louder as better, fuller, and more present.
Most compressors add makeup gain by default, so the engaged plugin is louder than the bypassed one, and your brain reports the difference as “the compressor sounds better.”
It often is not better, it is just louder.
Pull the makeup gain down until the meter reads the same with and without the plugin, and only then judge what the compressor is doing.
What should you listen for first when A/B-ing compression?
Listen for shape changes, not tone changes. Compression rarely changes the frequency content of a signal.
It changes how a sound starts, sustains, and decays. On drums, listen for whether the click of the stick is there or missing.
On vocals, listen for whether quiet syllables are louder than they used to be. On a full mix, listen for whether the room tone or reverb tail is more present.
Those three signals (transient, syllable lift, room density) cover most of what compression does.
How long should ear-training drills take daily?
Ten minutes a day, every day, for four weeks. Short focused sessions outperform long unfocused ones for ear training.
Pick one source, one parameter, do a handful of gain-matched A/B comparisons, and stop.
The producers who improve fastest are the ones who do this small drill daily, not the ones who watch tutorials for an hour and then practice nothing.
Consistency beats volume in any perceptual skill.
Can headphones work for hearing compression?
Yes, in fact headphones often expose compression artifacts more clearly than monitors at low volume.
The detail you need to hear (transient changes, pumping, room-tone lift) sits in the midrange and is not dependent on a full-range monitor system.
Use closed-back headphones for isolation and avoid any in-headphone DSP processing. A flat response is more important than a high-end driver.
Why does the compressed signal always sound louder, even when I think I gain-matched?
Because peak meters and RMS meters can disagree on what “matched” means A compressed signal has a higher RMS for the same peak level, which the ear perceives as louder.
Match on perceived loudness (LUFS) rather than peak.
Most modern DAWs include a loudness meter, and many compressors now have an auto-gain feature that does this for you.
If your DAW does not have LUFS metering, a free LUFS plugin closes the gap fast.
Is there a measurement that can confirm what my ears are hearing?
Yes. Crest factor (the gap between peak and RMS, in dB) is the single best objective measurement of how compressed a signal is.
A raw vocal might land at 14 dB crest factor. After compression, that drops to 8 or 9 dB. The number tells you exactly how much dynamic range has been removed.
Measuring before and after compression is a useful way to confirm that what you think you hear matches what the signal is actually doing.
The Bottom Line
Hearing compression is a learnable skill, not a talent.
The framework is short: level-match, use exaggerated settings, change one parameter at a time, pick the right source for the parameter you’re training.
Ten minutes a day, every day, for four weeks will get you further than ten hours of unstructured listening.
Start with the attack on drums, move to release on the same drum loop, then sustained sounds on vocals, and finish with ratio on a full mix.
And if you’d rather pair your ear with a measurement, the Compression Analyzer gives you the crest factor and settings in about 10 seconds. Use it as a sanity check while you train.
Ear training is one half of compression; the applied craft is the other.
The complete audio compression guide is the hub for everything from settings to context across the mix.