Your mix has one stubborn problem. The low end pumps every time the bass and kick hit together. Or the vocal turns harsh on certain words.
Or the cymbals splash forward while the rest of the kit sits fine.
You reach for a normal compressor, and it fixes the problem band but flattens everything else along with it.
You are trading one issue for another.
The tool built for exactly this is multiband compression.
It splits your signal into frequency bands and compresses each one separately, so you can tame the problem range and leave the rest of the sound untouched.
This post explains how it works, when to actually use it, and how to set one up without making your mix worse.
TL;DR
- Multiband compression splits audio into frequency bands and compresses each one independently.
- Think of it as several compressors in one, each working on only its slice of the spectrum: lows, mids, highs.
- Use it for frequency-specific problems a normal compressor cannot solve: a pumping low end, a harsh band, an uneven mix, or master.
- It is a specialist tool, not a default. Try EQ or standard compression first. Reach for multiband when the problem lives in one band only.
The rest is mechanics: how crossovers draw the bands, where multiband ends and dynamic EQ begins, and a four-step setup that will not wreck the mix.
What Multiband Compression Is
A standard compressor looks at your whole signal at once. When any part of it gets loud, the compressor turns the entire signal down.
A loud kick drum can duck your vocal because the compressor cannot tell them apart.
Multiband compression removes that limitation.
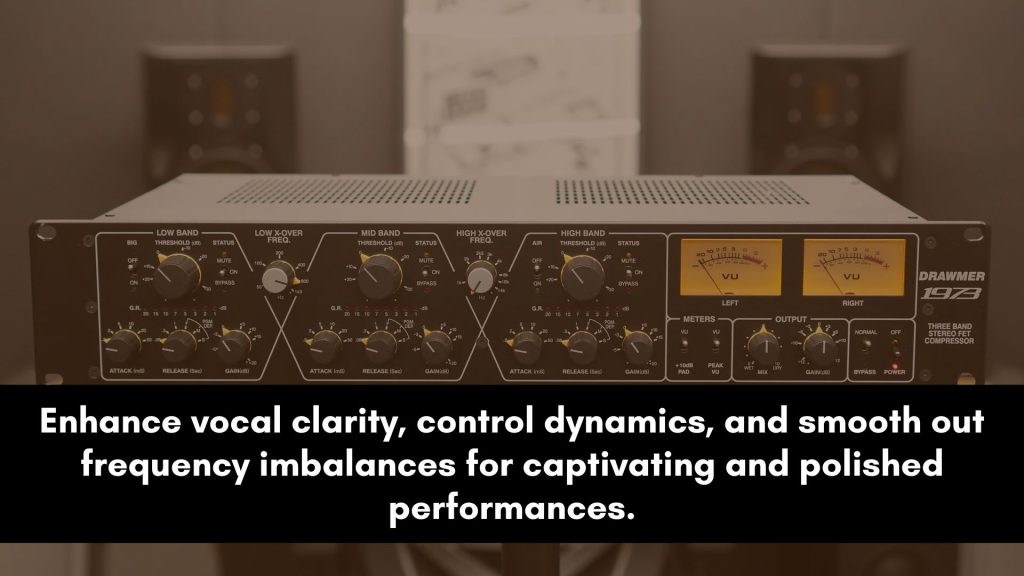
It divides the frequency spectrum into separate bands, commonly two to five, and gives each band its own compressor with its own threshold, ratio, attack, and release.
The low band can be compressed hard while the high band is left alone, all on the same track at the same time.
The simplest way to picture it: a multiband compressor is several compressors stacked side by side, each one assigned a slice of the spectrum.
That is the whole idea. Everything else is just detail about where the slices are drawn and how hard each one squeezes.
How Crossovers Split the Signal
The bands are created by crossover filters.
A crossover is a frequency point where the signal is divided, sending everything below it to one band and everything above it to the next.
They are the single most important setting on a multiband compressor.
A three-band setup has two crossover points.
You might place one around 120 Hz to isolate the low end, and another around 4 kHz to isolate the highs, leaving the midrange in between.
Each band then has its own compressor that only acts on the frequencies inside it.
Crossover placement decides what each band actually contains, so it matters more than any other control.
A crossover set 200 Hz too high will pull body out of your low band and into the mids, and your careful threshold settings will be working on the wrong frequencies.
Set the crossovers first, then compress.
Want to see which frequency band is actually causing your problem? Drop your WAV or MP3 into the Compression Analyzer.
How It Differs From Regular Compression
The difference is scope. A standard compressor is a single decision applied to the entire frequency range.
A multiband compressor is several independent decisions, one per band. That changes what each tool is good at.
A standard compressor is the right call when the whole signal needs the same treatment: gluing a mix, leveling a vocal, or controlling a full drum bus.
That glue job on the 2-bus is its own craft; mix bus compression covers it.
A single-band unit is faster to set up, harder to get wrong, and it preserves the natural relationship between frequencies because it treats them all equally.
A multiband compressor is the right call when one band misbehaves while the rest is fine. It can fix that band without touching the others.
The cost is complexity: more controls, more ways to overdo it, and a real risk of an unnatural result if you compress the bands into a shape the source never had.
More power, less forgiveness.
Multiband Compression vs Dynamic EQ
This is the comparison that confuses producers most, because the two tools overlap. Both react to level, and both work on specific frequency ranges.
The difference is in how surgical they are.
A multiband compressor works in fixed bands set by crossovers, and when a band is triggered, it compresses everything inside that band.
A dynamic EQ works at a specific frequency with an adjustable bandwidth, and it only moves that narrow curve when the signal triggers it.
Dynamic EQ is the more precise, more transparent scalpel. Multiband is the broader, more powerful tool.
A rough rule: if you want to tame one narrow problem frequency, such as a single resonant note, dynamic EQ is usually cleaner.
If you want to control the dynamics of a whole region of the spectrum, such as taming the entire low end of a master, multiband compression is the better fit.
Many engineers keep both and pick by how wide the problem is.
When to Actually Reach for It
Multiband compression is powerful, which makes it tempting to use everywhere.
Resist that. Most mix problems are solved faster and more naturally with EQ or a standard compressor.
Multiband earns its place only when the problem is genuinely frequency-specific. These are the situations where it is the right tool.
- A pumping low end: compress only the low band so the kick and bass stop dragging the whole mix down with them.
- Mastering an uneven mix: when you cannot revisit the mix, multiband evens out a bass-heavy or harsh region across the finished stereo file. The single-band side of that job is in best compressor settings for mastering.
- Taming a harsh band: rein in an aggressive upper-mid or presence range without dulling the lows.
- Controlling a busy bus: soften splashy cymbals on a drum bus while leaving the kick and snare punch intact.
- Vocal sibilance and harshness: a de-esser is a single-band multiband compressor. For broader vocal work, see our guide to multiband compression on vocals.
If your problem is not on that list, a normal compressor or an EQ move is probably the faster fix.
Have a specific goal before you open a multiband compressor. Opening one with no plan is how mixes get worse.
How to Set One Up Step by Step
The controls look intimidating, but a disciplined order makes it straightforward. Work one band at a time and the tool stops being overwhelming.
Step 1: Start from a neutral state
Raise every band’s threshold to 0 dB so no compression is happening at all. You want a blank slate, not a preset fighting your decisions.
Now nothing is being processed until you choose it.
Step 2: Set the crossover points
Place the crossovers so the band you care about contains the problem and nothing else.
Solo each band while you adjust the crossover so you can hear exactly which frequencies fall inside it.
Get this right before you touch a single threshold.
Step 3: Compress one band at a time
Work on only the problem band.
Lower its threshold until the gain reduction meter shows the band being controlled, then set its ratio, attack, and release the same way you would on a normal compressor.
If the ratio number itself still feels arbitrary, audio compressor ratio explained settles it. Leave the other bands alone unless they genuinely need work too.
Step 4: Bypass and compare
Match the output level, then toggle the multiband compressor on and off. The processed version should fix the problem without sounding unnatural.
If it sounds worse, you have compressed too hard or split the bands in the wrong place.
Try it on anything: a full mix, a master, a drum bus. Launch the Compression Analyzer →
Crossover and Band Starting Points
There is no universal preset, because the right crossovers depend on the source.
The table below gives sensible starting points for a three-band setup on common material.
Move the crossovers by ear while soloing each band.
| Source | Low / mid crossover | Mid / high crossover | Most common target band |
|---|---|---|---|
| Full mix / master | 100–150 Hz | 3–5 kHz | Low band (tame pumping bass) |
| Drum bus | 120–200 Hz | 5–8 kHz | High band (control cymbals) |
| Vocal | 200–400 Hz | 5–7 kHz | High band (sibilance, harshness) |
| Bass | 120–250 Hz | 1–2 kHz | Low band (even out sub level) |
Use these as a launch pad, not a rule.
The goal is always to draw the band boundaries so the frequencies you want to fix fall cleanly inside one band.
3 Common Mistakes to Avoid
Multiband compression goes wrong in predictable ways. All three of the big ones amount to using more of the tool than the problem needs.
1. Using it when you do not need to. If a normal compressor or an EQ move solves the problem, use that. Multiband is a specialist tool.
Reaching for it by default adds complexity and risk for no benefit.
2. Compressing every band. The power of multiband is treating one band while leaving the rest alone.
If you squeeze all the bands hard, you have just built a complicated standard compressor and you will likely make the mix sound unnatural.
3. Ignoring the crossover points. The crossovers decide what each band contains. Leave them on defaults, and your compression lands on the wrong frequencies.
Always solo the bands and set the crossovers around the actual problem first.
Ready to stop guessing? The Compression Analyzer will read your mix’s spectral balance and dynamics and recommend the compression settings that fit your actual track.
Frequently Asked Questions
The recurring multiband questions are mostly scope questions: which tool, which band, which order.
These six answers draw the lines.
What is multiband compression in simple terms?
Multiband compression splits an audio signal into separate frequency bands and compresses each band independently.
It works like several compressors in one, with each compressor controlling only its slice of the spectrum.
This lets you compress a problem range, such as a pumping low end, while leaving the rest of the sound untouched, which a standard compressor cannot do.
When should I use multiband compression?
Use multiband compression when a problem lives in one frequency band while the rest of the signal is fine.
Typical cases: a pumping low end, a harsh upper midrange, or an uneven master you cannot remix.
For problems that affect the whole signal evenly, a standard compressor is faster and more natural.
Try EQ or normal compression first, then reach for multiband.
What is the difference between multiband compression and dynamic EQ?
Multiband compression works in fixed bands set by crossovers and compresses everything in a band when it is triggered.
Dynamic EQ works at a specific frequency with an adjustable bandwidth and moves only that narrow curve.
Dynamic EQ is more surgical and transparent for narrow problems. Multiband is the broader, more powerful tool for controlling a whole region of the spectrum.
Should multiband compression come before or after EQ?
It depends on the goal. Many engineers EQ first to fix static tonal problems, then use multiband compression to control what remains dynamic.
If you are using multiband to tame a specific moving resonance, placing a corrective EQ before it can make its job easier.
There is no fixed rule, so let the problem you are solving decide the order.
What are the disadvantages of multiband compression?
Multiband compression is complex, with many controls and many ways to get a poor result.
Compressing the bands into a shape the source never had can sound unnatural.
It is also easy to overuse it on problems a simple EQ or standard compressor would fix faster. It is a specialist tool, best used with a clear goal rather than as a default.
Is a de-esser a multiband compressor?
Essentially yes. A de-esser is a multiband compressor focused on a single high-frequency band, the sibilance range of a vocal.
It compresses only that band when harsh “s” sounds get loud, leaving the rest of the vocal alone.
Understanding a de-esser is a good way to grasp how a full multiband compressor works across the whole spectrum.
The Bottom Line
Multiband compression is several compressors in one, each handling a slice of the frequency spectrum.
That makes it the right tool for one specific job: fixing a problem that lives in one band while leaving the rest of the sound alone.
It is powerful and unforgiving, so set your crossovers first, compress one band at a time, and reach for it only when a normal compressor or EQ cannot do the job.
And if you’d rather see exactly where your mix is uneven before you start, the Compression Analyzer gives you the spectral balance and fitting settings in about 3 seconds.
Multiband assumes you already speak basic compressor. If any of this felt like vocabulary, the complete audio compression guide starts at the beginning.
Practice and experimentation are crucial. Set the crossovers, treat one band at a time, and let your ears be the final judge, and you’ll nail compression faster.
how to control tonal balance using the multiband compression, i have been using it in combination with a true balance plugin, however my mix was thrown far, please help me Sir.
Hi, I’m willing to help, but you need to be specific.