Every vocal recording presents unique challenges, and sibilance can be one of the most frustrating.
Those sharp, hissing "S" sounds can distract from an otherwise flawless performance, but fear not – with the right de-essing techniques, you can bring out the best in your vocals.
In essence, de-essers are just a 'regular' form of vocal compression triggered by sibilant frequencies.
However, many de-essers can target specific frequency regions as well.
Techniques for De-Essing Vocals
De-essing vocals can make or break a vocal recording.
By reducing or removing the harsh "S" sounds that naturally occur in speech, you can create a polished and professional-sounding vocal mix that puts the focus squarely on the singer's performance.
Conversely, neglecting to de-ess can result in distracting and unpleasant listening experiences, making it difficult for listeners to engage with the lyrics or melody.
So, getting rid of sibilance on a vocal is very crucial when mixing music.
Below are some of the most popular methods:
Manual Gain Riding

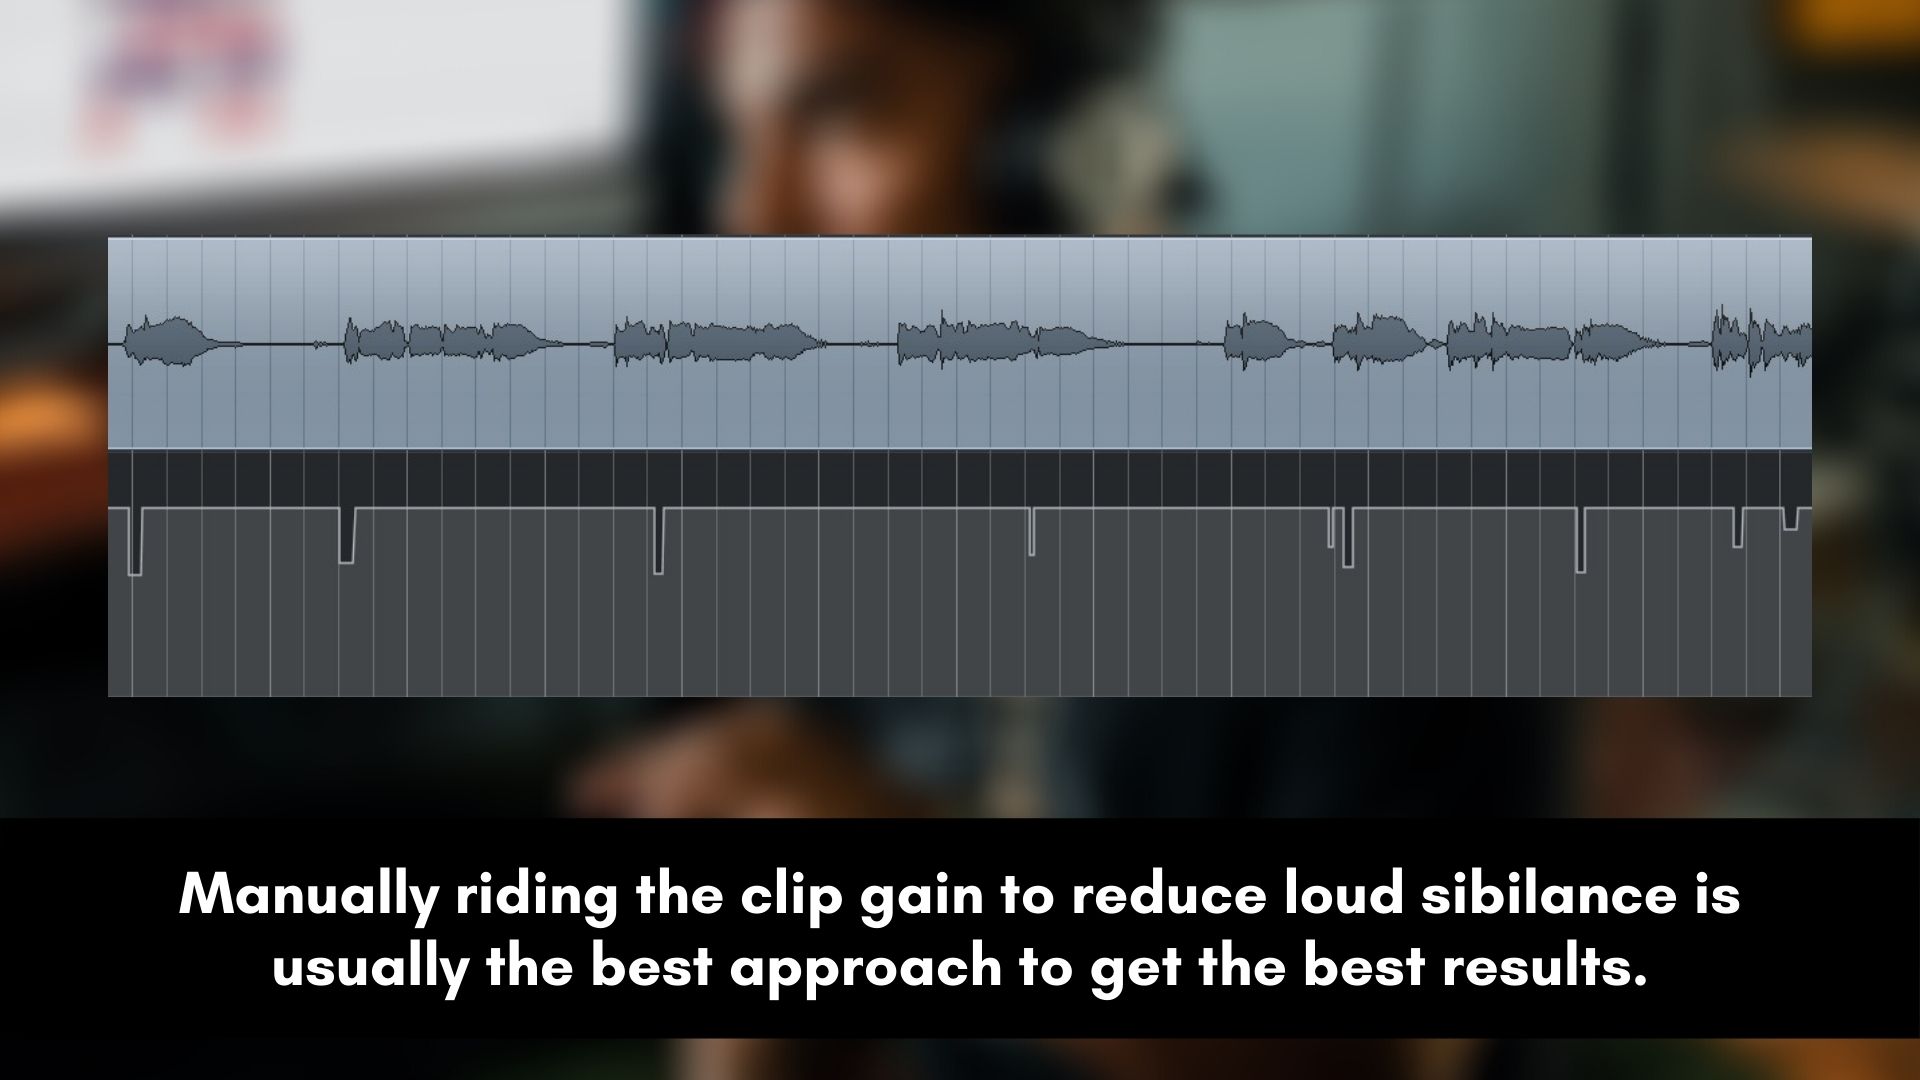
The approach that will work best for most vocals, if not all, is manual gain riding.
Gain riding is the act of constantly adjusting the gain to prevent sounds from getting way too loud or to bring them up if they’re too quiet.
In this case, you’ll manually adjust the gain whenever the sibilants get way too loud.
Make sure that you don’t ride the fader; instead, write the automation using the clip gain or pre-gain.
This way, you’ll be able to adjust the fader later for balance.
Yes, this approach can be time-consuming but doing it this way will give you better control over sibilance than relying on a tool to do the job for you.
Since you’ll be in control, you won’t miss certain consonants because an “S” may not happen at the same frequency as the letter “F” or the “SH” consonant.
So, a tool might miss some consonants; that’s why manual gain riding is mostly the best choice in many cases.
Split-Track De-essing

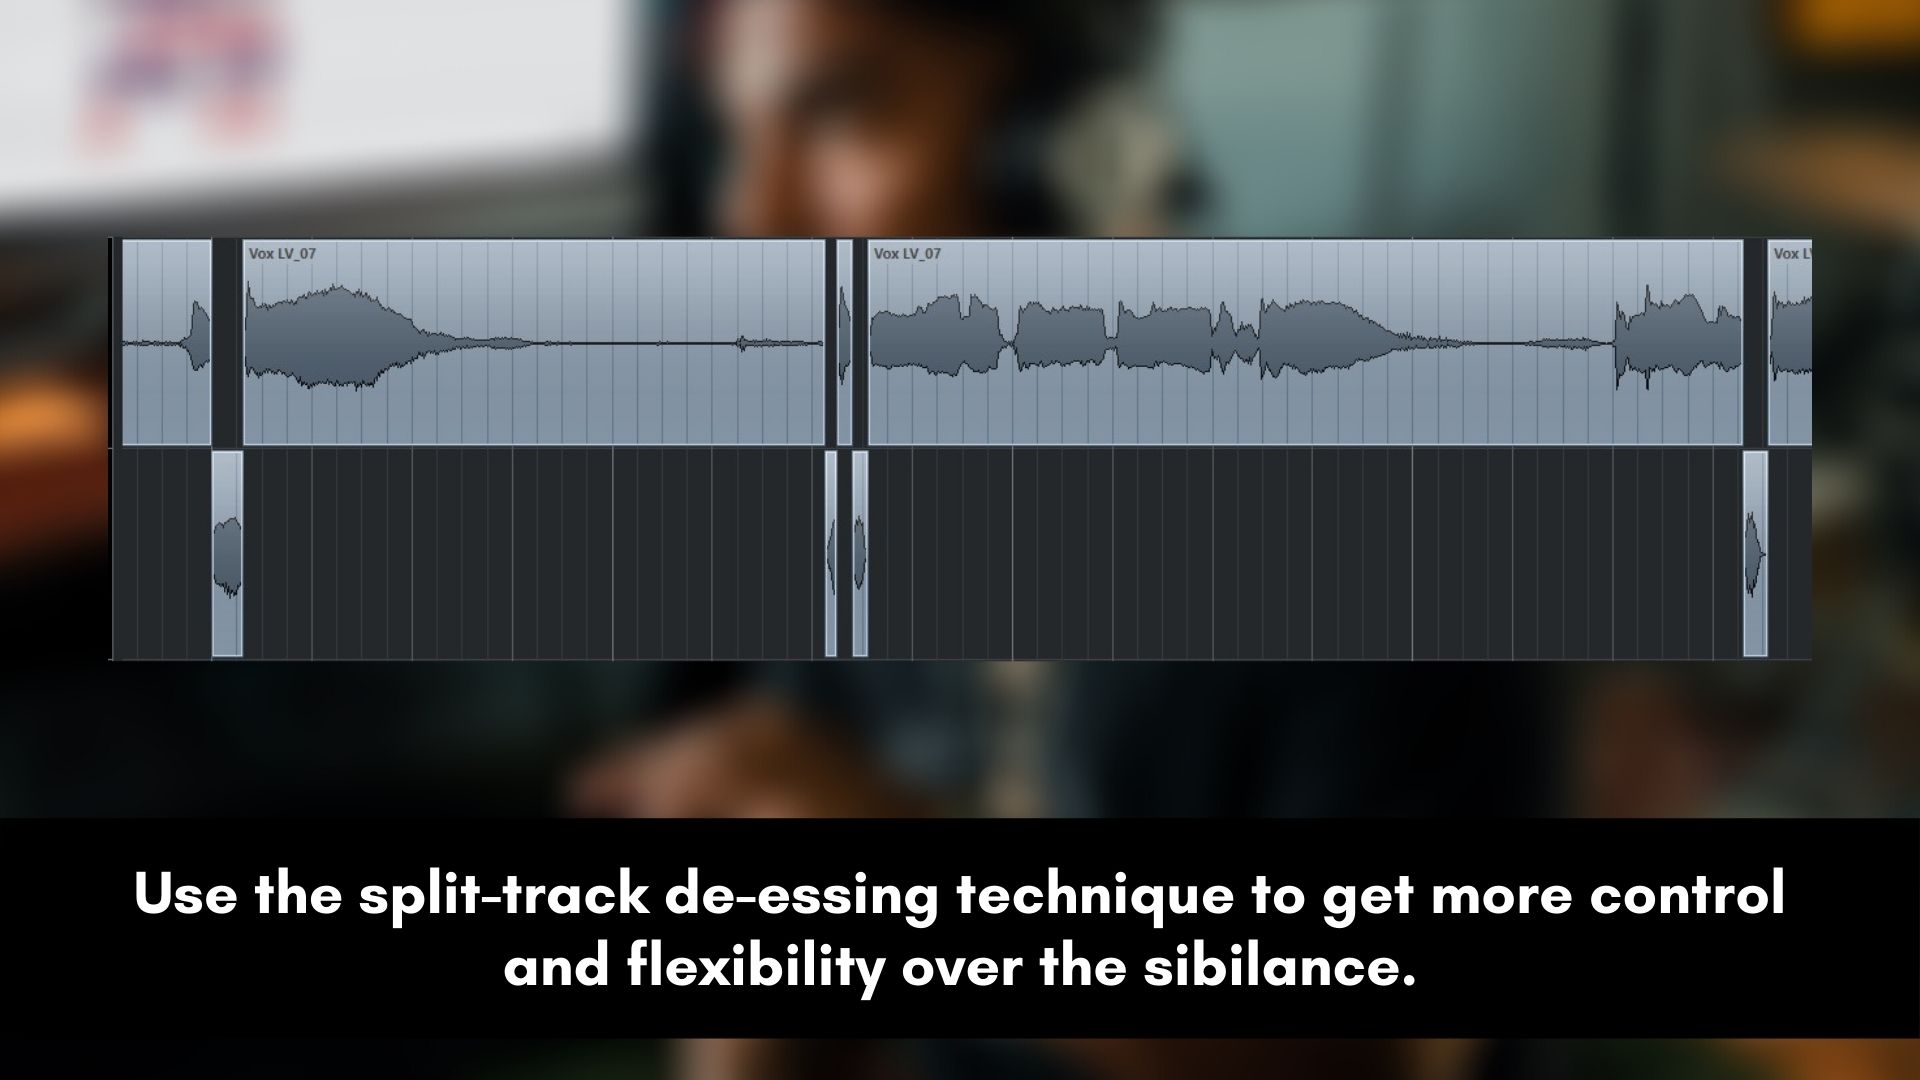
Another great approach that will help you get the best results when controlling sibilance is to use split-track de-essing.
To do this, you’ll have to cut out all the sibilance and put it on a separate track.
This means you’ll have to manually cut each sibilance sound out of the vocal track one by one and move them on to a separate channel.
Yes, this is also time-consuming but it will give you better control and more flexibility.
You’ll be able to process the sibilance differently from the main vocal for the best results.
This is why professional mixing engineers have an assistant to take care of all this time consuming and labor-intensive stuff.
Professional engineers will get someone else to do it because they understand the importance of manual gain riding and split-track de-essing.
When you’re done with splitting the sibilants, always make sure that you use crossfades to avoid clicks.
De-essing Vocals in Stages

One thing that you don’t want to do is overwork one de-esser plugin.
If you overwork one de-esser it can sometimes result in tonal artifacts.
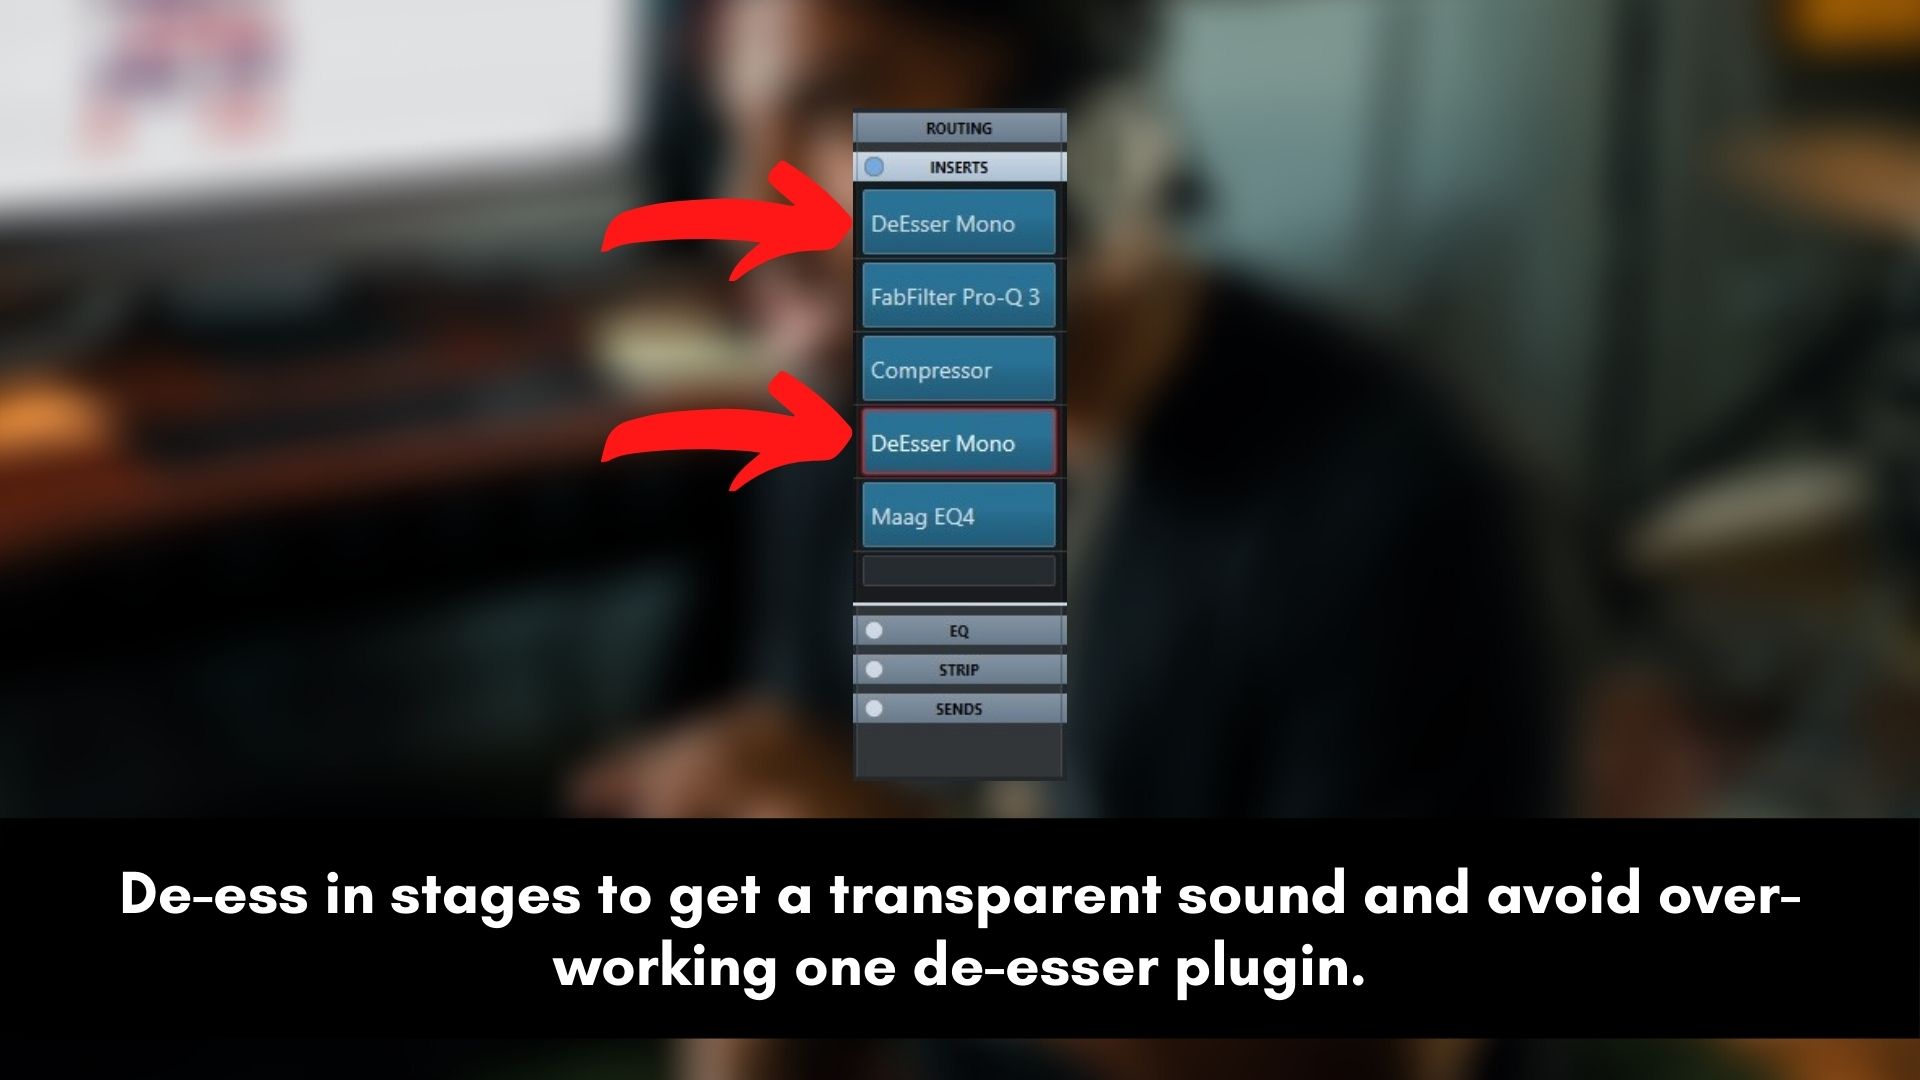
To avoid that or making a vocal sound unnatural, you can de-esse in 2 or even 3 different stages.
For instance, the first stage will be a de-esser in the first insert slot of your vocal chain.
The second stage will be after the EQ and compressor.
Finally, the third stage will be in the form of a multiband compressor or dynamic EQ in the vocal bus/group (only if it’s necessary).
This way, you'll get transparent de-essing because each de-esser will be doing a minimal amount of gain reduction.
Another benefit of de-essing in different stages is that you can target different frequencies to control consonants that occur in different frequency bands.
So, you can have one de-esser taking care of the frequencies between 2 kHz and 5 kHz.
The second one controlling the frequencies between 5kHz and 10kHz.
This sounds better than having one de-esser plugin take care of a wide range of frequencies.
You can have them in serial (one after the other) or have them in different slots in your chain.
The best thing to do is to always test and explore different tactics.
Even after doing some manual gain riding, you may find that the compressor brings up some of the sibilance.
Then you’ll have to use a de-esser to tame down a dB or two to keep the sibilance under control.
Frequency Band Reduction
Frequency Band Reduction is a popular de-essing technique that involves using an equalizer to target and reduce the frequency range where sibilance occurs.
By selectively attenuating this range, you can effectively tame harsh "S" sounds without affecting the overall tonality or clarity of the vocal.
To use this technique, start by identifying the frequency range where the sibilance is most prominent.
You can do this by sweeping a narrow-band EQ across the vocal until you hear the sibilance become more pronounced.
Once you've identified the problematic frequency range, use a bell-shaped EQ to reduce the level of that frequency range by a few dB.
One important consideration when using frequency band reduction is to avoid affecting other important elements of the voice.
For example, if you apply too much attenuation to the high-mids, you risk dulling the singer's consonants or other high-frequency details that are crucial for intelligibility.
Be careful not to overdo it, as too much reduction can make the vocal sound dull or muffled.
Vocal De-essing complete guide. Learn the BEST way to get rid of sibilance in vocals...
Dynamic EQ
Dynamic EQ allows you to target specific frequency ranges and apply EQ only when certain frequencies exceed a certain threshold.
This is particularly useful for de-essing, as it allows you to only reduce sibilance when it becomes too prominent in the mix.
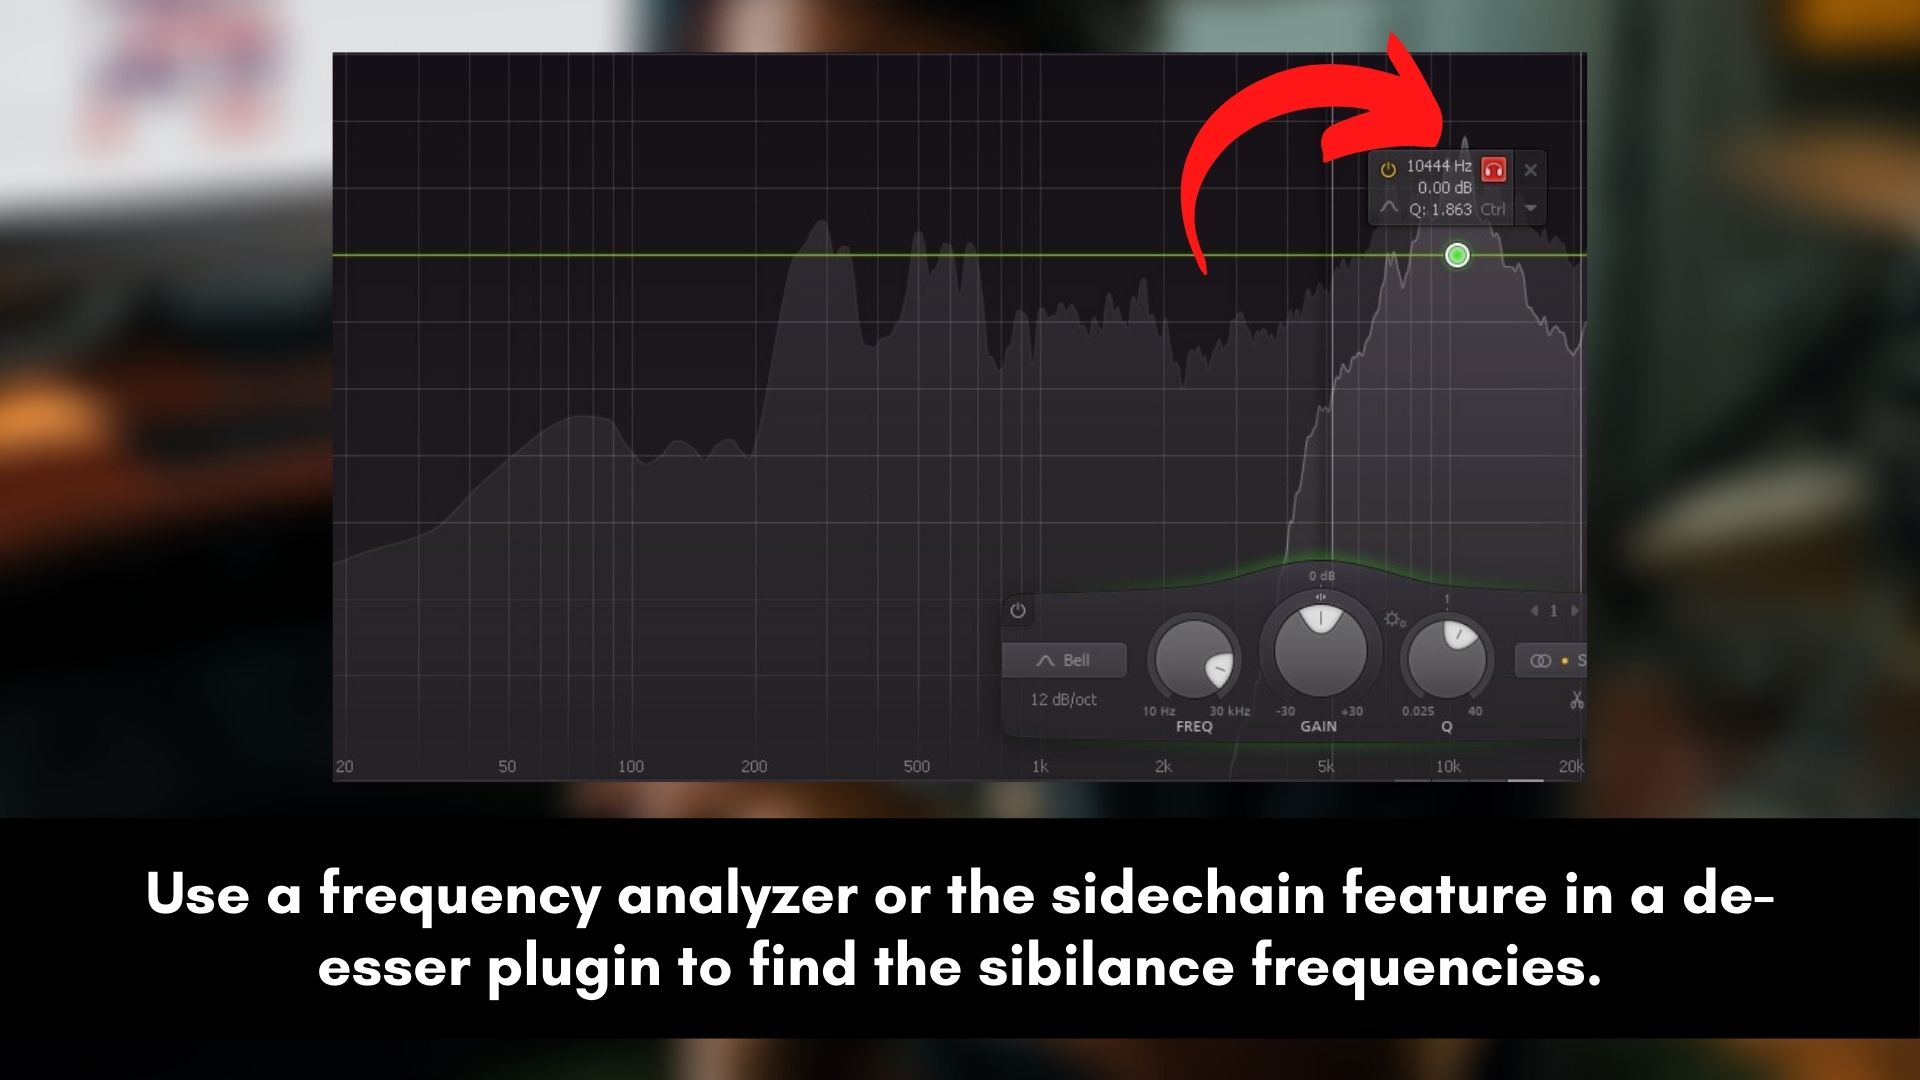
To use dynamic EQ for de-essing, start by identifying the problem frequency range using a frequency analyzer.
Once you've identified the problem frequencies, create a band in your dynamic EQ plugin that targets that range.
Set the threshold just below the offending sibilance, and adjust the attack and release times to ensure that the EQ reacts quickly enough to reduce the sibilance but doesn't affect the natural character of the vocals.
One advantage of using dynamic EQ for de-essing is that it can be more transparent than traditional de-essing techniques, as it only reduces the offending frequencies when they become too prominent in the mix.
This means that you can achieve a clean and polished vocal sound without sacrificing the natural character and tone of the performance.
De-Esser Plugins
De-esser plugins are designed to specifically target the problem frequencies and reduce them without affecting the rest of the track.
Some plugins offer different modes to choose from, such as wide-band or split-band processing, which can affect the sound and character of the de-essing.
It's important to find a de-esser plugin that works well with your specific vocal track and to adjust the settings based on the severity of the sibilance.
Some popular de-esser plugins include Waves Renaissance DeEsser, FabFilter Pro-DS, and Sonnox Oxford SuprEsser.
When using a de-esser plugin, it's important to listen to the results in context with the rest of the mix and make adjustments as necessary.
Multiband Compression
Multiband compression is a technique that allows you to control the dynamics of specific frequency ranges in a sound source.
With de-essing, it can be used to target only the problematic sibilant frequencies without affecting the rest of the vocal performance.
By setting the appropriate threshold, ratio, attack, and release parameters, multiband compression can effectively tame the harshness of the vocal without sacrificing its clarity and presence.
However, it's important to use multiband compression sparingly and in conjunction with other de-essing techniques, such as dynamic EQ and de-esser plugins, to achieve the desired result.
Experiment with different settings to find the right balance between reducing the sibilance and maintaining the natural sound of the vocal performance.
Automate Your De-esser Settings
Always keep in mind that a de-esser is a tool, so it’s not 100% accurate all the time.
Sibilance will be different throughout the song, and the de-esser can miss some sibilance or over-compress it in some situations.
To avoid making the de-esser squash the signal or fail to catch some sibilance, you’ll have to automate your de-esser settings.
This will help a performance shine.
By automating the de-esser settings, you’ll have more control over the de-esser and maximize the potential of the performance for the best possible sound.
These are just a few of the most popular techniques used for vocal de-essing.
Each method has its strengths and weaknesses, so it's important to experiment with different techniques and plugins to find what works best for your specific setup.
Remember, it's important to use a subtle approach when de-essing to avoid making the vocals sound unnatural.
Always use A/B testing to compare the results of de-essing with the original recording.
This can help you achieve the best possible results.
Tips for Effective Results
- Start with a good recording: The best way to avoid sibilance issues is to start with a good recording. Proper microphone placement, pop filters, and using the right microphone for the vocalist can all help reduce sibilance issues from the start.
- Use multiple techniques: Different de-essing techniques can work better for different types of sibilance. Using a combination of techniques such as frequency band reduction, dynamic EQ, and de-esser plugins can help achieve optimal results.
- Avoid over-de-essing: Over-de-essing can make vocals sound unnatural and dull. This can also make the singer sound like they have a lisp. Always use A/B testing to compare the results of de-essing with the original recording to ensure you're achieving a natural-sounding result.
- Automate the threshold: The threshold of the de-esser plugin determines at what volume the plugin starts to reduce the sibilance. Automating the threshold can help achieve a better balance between reducing sibilance and maintaining the natural sound of the vocals.
- Use a parallel de-esser: Another technique is to use a parallel de-esser, which duplicates the vocal track and applies heavy de-essing to the duplicate track. You can then blend the de-essed duplicate track with the original track to achieve a more natural-sounding result.
- Listen in context: Always listen to the de-essing in the context of the full mix. De-essing may sound different in isolation compared to when played with other instruments, so it's important to listen to it in context to ensure it's sitting well in the mix.
De-Esser Frequency Range

One of the key factors in effective de-essing is choosing the right frequency range to target.
The most common frequency range for de-essing vocals is between 4-8 kHz, where sibilance occurs.
However, the exact frequency range can vary depending on the gender of the vocalist.
Male vocals typically have a lower frequency range than female vocals, and therefore may require different de-esser settings.
Target frequencies are around 4-6 kHz for males. This is the most common frequency range for de-essing male vocals.
Female vocals, on the other hand, usually have a higher frequency range than male vocals.
Normally, you should target frequencies around 5-8 kHz when working on a female voice.
Remember, these are just starting points for de-essing male and female vocals.
Use your ears to determine the best frequency range for your specific recording, and choose a range that makes the voice sound smoother.
FAQ:
What is De-essing
De-Essing is the method that’s used to control harsh and loud frequencies that cause spitting or piercing sibilance.
Sibilance is the hissing sound that may occur during recording when a vocalist sings words including the letters S, F, X, T, SH, and soft Cs.
De-essing is often required when mixing music, but it’s not always a straightforward process.
Every song will usually require a different approach to make sure that you don’t impact the character of the vocals in a bad way.
So, whatever method of de-essing you choose, make sure that it’s the best approach for that particular voice.
Why is De-Essing important?
De-essing is an essential part of mixing (and mastering in some cases), especially for vocals.
Sibilance can cause discomfort for the listener and distract from the overall quality of the recording.
By reducing these harsh sounds, the vocals become smoother and more pleasant to listen to.
This can improve the overall quality of the mix and enhance the listener's experience.
Should de-esser come before or after EQ?
The order of processing effects like de-essing and EQ can depend on the specific situation and desired outcome.
However, a general rule of thumb is to apply de-essing before any EQ adjustments.
The reason for this is that de-essing is primarily focused on reducing harshness in the upper mid-range, where sibilance occurs.
If you apply EQ before de-essing, you may unintentionally boost or accentuate those harsh frequencies, making it more difficult to effectively reduce sibilance with a de-esser.
By applying de-essing before EQ, you can reduce any sibilance in the vocal track before making any tonal adjustments.
This can help to create a smoother, more organic-sounding vocal track.
However, it's worth noting that there may be exceptions to this rule, depending on the specific needs of the mix.
In some cases, applying EQ before de-essing may be necessary to address specific tonal issues in the vocal track.
So, the order of processing effects should be determined by careful listening and experimentation.
Should de-esser come before or after the compressor?
A general rule of thumb is to apply compression before de-essing.
The reason for this is that compression helps to even out the dynamic range of the vocal track, reducing the volume of louder parts and boosting the volume of quieter parts.
By compressing the vocal track before de-essing, you can help ensure that the de-esser is targeting the sibilant frequencies at a consistent level.
If you were to apply de-essing before compression, the de-esser might be triggered by the sibilant peaks and valleys that occur naturally in the vocal performance, leading to inconsistent results.
In some cases, this could even result in the de-esser overcompensating for sibilance, making the vocal track sound dull or unnatural.
Where does the de-esser go in the chain?
The placement of a de-esser in your vocal chain can vary depending on your mixing approach and the specific needs of the track.
In general, de-essers are often placed after surgical EQ and compression but before any effects like reverb or delay.
By placing the de-esser after surgical EQ and compression, you can more precisely target the frequency range where sibilance is most problematic and avoid over-processing the vocal signal.
This can help preserve the natural character and tonality of the singer's voice while still achieving effective de-essing.
Ultimately, there is no one "correct" placement for a de-esser in your vocal chain, and experimentation is often the key to finding the right approach for your mix.
Wrap
When it comes to de-essing, there’s no one-size-fits-all setting.
Each mix requires an approach that will get you the best results for that particular song.
It is also a good decision to de-ess a vocal while listening to the entire mix in context without listening to the vocal in solo.
This will reduce the chance of over-doing the de-essing.
Remember, always strive to get a great sound during recording; that’s how you’ll get the best final results.
I hope you found tons of value from this post and now understand that de-essing is not just about adding a de-esser plugin and setting it and forgetting it.
Leave a comment below to share your thoughts.
