You import 40 stems into a fresh session. Every track is named “Audio 27.wav” or “vox_FINAL_v3.wav.”
Three are clipping. Two are silent. The drummer’s takes are spread across nine playlists with no clear winner.
The vocal stack is in alphabetical order, not section order. You open the EQ on track 14 to start mixing and realize you have no idea what track 14 even is.
Forty minutes later you have a mess and not a mix.
The fastest mixes start with the most boring step: prep.
A clean session with labeled tracks, balanced levels, committed comps, and clear markers cuts the actual mix time in half because every later decision happens against a predictable foundation.
The mixes that drag on for days are usually the ones that skipped prep.
Prep is a checklist, not an art. Six steps: arrange and clean, set clip gain, comp the takes, check phase and timing, route and color-code, and load references.
Each gets its own pass below, with targets and typical times attached.
TL;DR: The 6-Step Mix Prep Workflow
The short version. Six passes, one order, every session. The prep debt you skip here gets paid with interest mid-mix.
- 1. Arrange and clean. Label tracks, delete empties, deactivate unused, set tempo and markers.
- 2. Clip gain and static balance. Get every channel to -18 dBFS average before any fader moves.
- 3. Comp the best takes. Pick winning lanes, cross-fade splices, commit to one composite per source.
- 4. Check phase and fix timing. Flip polarities, align doubled mics, quantize loosely where needed.
- 5. Route and color-code. Create buses, color-code by section, and set markers for every song section.
- 6. Load reference tracks. Two or three commercial tracks at matched loudness for A/B during the mix.
Step 1: Arrange and Clean the Session

The first 15 minutes of prep are organizational, not technical. Walk through every track and clean up the session before any audio decisions get made.
Label every track with a clear name. “Lead Verse 1” beats “Audio 47.” “Hook Doubles L” beats “vox new new final.”
Delete empty tracks and any takes the artist already rejected. Deactivate unused tracks so they do not clutter the channel strip.
Reorder tracks into a consistent layout: drums first, then bass, then guitars, then keys, then vocals, then effects and atmospheres. Set the session tempo correctly.
Clean up the audio at the clip level. Trim silence and dead air from every region. Apply fade-ins and fade-outs to prevent clicks at edit points.
Strip breaths if the artist or producer wants them out (most modern productions cut breaths; some genres leave them in).
Listen to each track in solo for 30 seconds to catch noise floor problems, pops, or dropouts that need editing now.
Step 2: Clip Gain and Static Balance

Before any fader moves, set the gain structure.
Clip gain (or a trim plugin on the first insert) adjusts the level into every plugin downstream, which means it controls how the entire chain behaves.
Target -18 dBFS average per channel with peaks around -10 dBFS.
This is the universal sweet spot for analog-modeled plugins (compressors, EQs, saturators) and gives plenty of headroom on the bus and master.
Drag clip gain handles down on hot tracks. Use a trim plugin on tracks where the clip-gain workflow is awkward.
Gain staging tracks these targets through every later stage of the chain.
Once clip gain is set, do a static fader pass. Pull every fader to unity, then bring up kick first, then snare, then bass, then vocal, then the rest.
The static balance reveals which tracks need EQ work and which already sit. The mix should feel close to right on faders alone.
Step 3: Comp the Best Takes

Comping is the process of stitching the best moments from multiple takes into one composite track.
The artist or producer has already made some decisions; the mix prep stage is for finalizing them.
Lay out the takes in lanes (Pro Tools playlists, Logic take folders, Cubase lanes, Ableton clip stacks).
Audition each lane in turn, mark the winners with the rating or color tool, and stitch them into one composite.
Apply cross-fades at every splice (20 ms minimum) so the seams do not click when the bus compressor hits.
Vocal comping deserves its own workflow because the lead vocal carries the song.
Comp the lead first, then the doubles, then the BGV stacks; how to prepare vocals for mixing expands that into the complete vocal prep pass.
Drum comping has different priorities, catching the cleanest groove rather than the best phrase, and editing drums before mixing works from that angle.
Step 4: Check Phase and Fix Timing
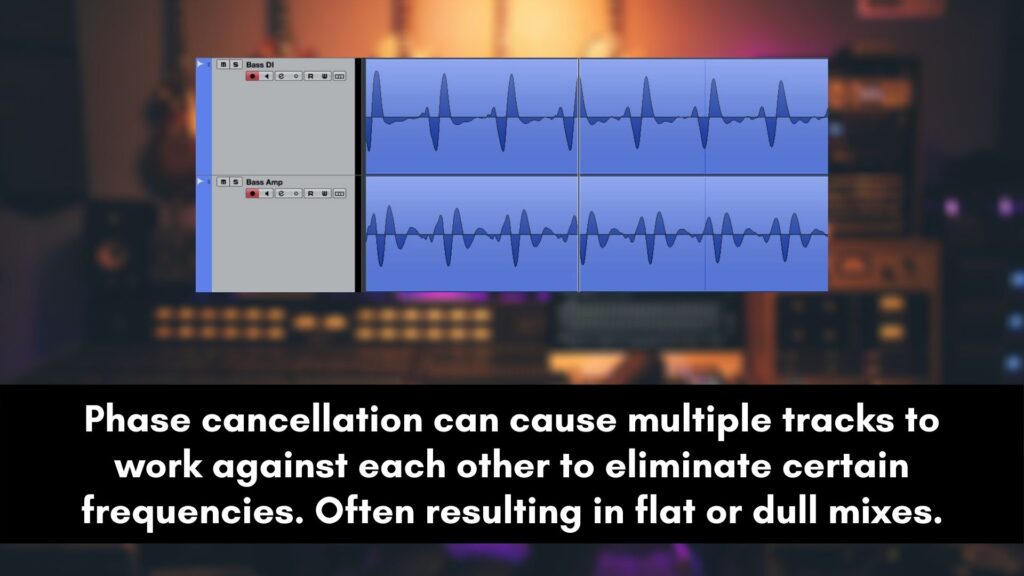
Phase problems and timing drift are the two biggest hidden killers of a clean mix. Both have to be caught at prep, before any compression or saturation amplifies them.
Phase first. Any source recorded with two microphones needs this check: kick in and out, snare top and bottom, doubled guitar mics, room pair against close mics.
Solo each pair together and flip the polarity on one. The version with more body and more low end is the correct setting.
The bottom snare mic is almost always wired out of polarity relative to the top by physical placement alone; flip it.
Check every pair before moving on.
Timing second. If the drummer rushed or dragged in a specific spot, fix it now.
Use Beat Detective, Elastic Audio, Cubase Hitpoints, or Logic Flex Time with conservative settings (50–70 percent strength).
Avoid over-quantizing; the goal is to fix what is broken, not to robotize what was working. For the vocal, fix only the obviously off moments, not every breath transition.
Step 5: Route, Color-Code, and Set Markers
The session needs structure that the mix will lean on for hours. Routing, color-coding, and markers turn 40 disorganized tracks into a navigable session.
Create buses. Drums to a drum bus. Snare top and bottom to a snare sub-bus that feeds the drum bus.
Tom close mics to a tom bus. Backing vocals to a BGV bus. Lead vocals stay on their own channel.
Effects on aux sends, not inserts: one stereo plate reverb send, one stereo delay send, one parallel compression bus.
Set up the routing once at prep and the rest of the mix uses it.
Color-code every track by section. Drums one color, bass another, guitars another, keys another, vocals another.
The colors make the channel strip readable at a glance even when 60 tracks are showing.
Set markers at every song section (intro, verse 1, pre-chorus, chorus 1, verse 2, etc.) so navigation across the song is instant.
Step 6: Load Reference Tracks
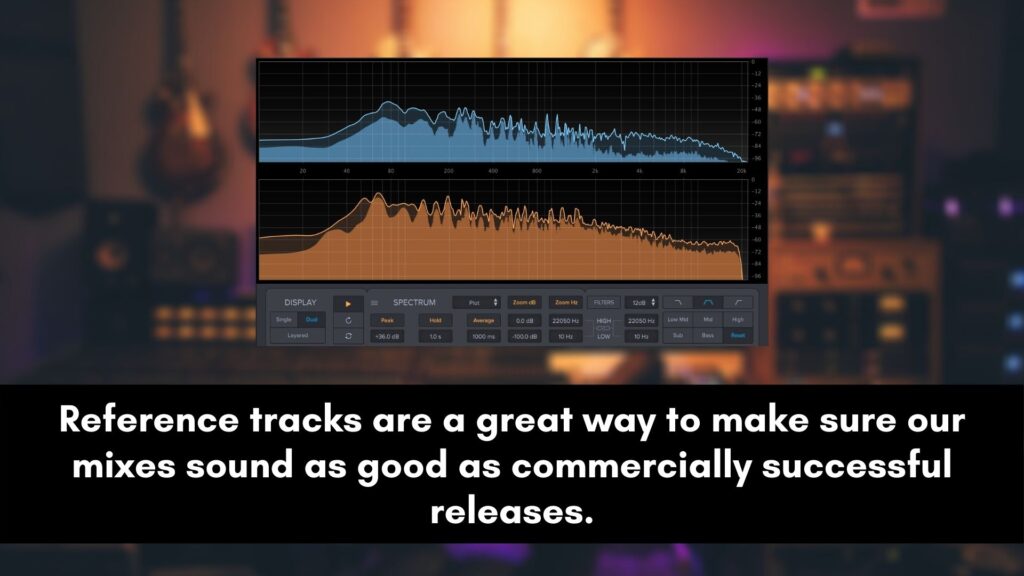
Pick two or three commercial tracks in the same genre as the song you are mixing. Drop them into the session on a muted channel.
Match their loudness to your in-progress mix using a LUFS meter (Spotify -14, Apple -16, YouTube -14).
The references are not for copying.
They are for refreshing your ears every 20–30 minutes during the mix so you can hear whether your processing is improving the song or making it worse.
A 10-second A/B against a reference is the fastest sanity check in the mix.
Pick references thoughtfully.
The kick on the reference should match the kick character you want. The vocal forwardness on the reference should match the role of the vocal in your song.
References that are wildly different in genre or feel mislead the mix rather than guide it.
Mix Prep Cheat Sheet
The full checklist on one page.
Use it as the at-a-glance reference at the start of every session. Time estimates are typical; clean sessions go faster, messy ones go slower.
| Step | Action | Tools | Typical time |
|---|---|---|---|
| 1. Arrange and clean | Label, delete empties, fade clips, set tempo | DAW edit tools | 15–20 min |
| 2. Clip gain and static balance | -18 dBFS average per channel, faders to unity | Clip gain, trim plugin, VU meter | 10–15 min |
| 3. Comp the best takes | Pick winners, cross-fade splices, consolidate | Lanes, playlists, rating tool | 20–40 min |
| 4. Phase and timing | Flip polarities, align mics, gentle quantize | Phase utility, Beat Detective, Elastic Audio | 10–20 min |
| 5. Route, color-code, markers | Buses, colors, section markers | DAW routing and marker tools | 10 min |
| 6. Load references | 2–3 commercial tracks, match loudness | LUFS meter | 5 min |
3 Common Mistakes That Slow Down Mixes
A mix that drags on for days almost always lost the time back here in prep. These three failures compound the longest.
- 1. Skipping the static balance. Reaching for a compressor on the kick before checking that the kick is even audible against the bass is a recipe for an hour of corrective work. The static balance reveals which decisions are level-related and which are tonal. Get the faders right first; the plugins come second.
- 2. Not committing comps before mixing. Keeping every take alive across nine playlists is a sign of indecision, not flexibility. Pick the winning takes, consolidate them into one composite per source, and move on. A clean comped track is mixable; a session full of lanes is a future bottleneck. The drum and vocal prep workflows in the drums complete guide and the vocals complete guide both assume the comping is done.
- 3. No reference tracks. Mixing without references is mixing in a vacuum. You will spend three times as long going back and forth before realizing the bass is half as loud as it should be. Load references at prep; A/B every 20 minutes.
Frequently Asked Questions
Prep questions are really budget questions: where the session time goes and what it buys. These six answers put numbers on it.
How long should mix preparation take?
For a typical three-minute song with 30 to 50 tracks, plan on 60 to 110 minutes of prep.
A clean recording with labeled tracks and committed comps goes fast; a chaotic session with eight playlists per track takes longer.
The time invested in prep saves multiples of itself during the mix because every later decision happens against a predictable foundation.
What is the most important step in mix prep?
Setting clip gain to -18 dBFS average per channel.
The gain structure determines how every plugin downstream behaves, and a session with consistent levels lets you focus on mix decisions rather than corrective gain work.
Static fader balance is the close second; the static mix reveals whether the song works with levels alone before any plugin loads.
Should I comp vocals before or after fixing tuning?
Comp first, then fix tuning.
The comp decision is creative (which take has the best feel and performance); the tuning decision is corrective (fixing pitch issues in the chosen take).
Doing the corrective work on takes you might reject wastes time. Comp the lead and the doubles first, then apply tuning to the committed comp tracks only.
Why does my mix sound different every session?
Usually because the prep is different each time.
Inconsistent clip gain, missing reference tracks, and undeleted-but-active tracks cluttering the bus all change the mix from session to session.
A consistent prep workflow gives you the same starting point every time, which makes the mix decisions reproducible and the engineer’s ear reliable across days.
Do I need a mix template?
A template with pre-built buses, color schemes, and aux sends saves 10 to 15 minutes per session, which adds up fast across a project.
Templates with default plugins pre-loaded are riskier; they encourage applying the same chain regardless of source.
The best balance: template the structure (buses, sends, color schemes, markers) but leave the plugins off until you have heard the source.
When should I load reference tracks?
At prep, as Step 6.
Load two or three commercial tracks in the same genre as the song you are mixing, on a muted channel, with loudness matched to your in-progress mix using a LUFS meter.
A/B against the references every 20 to 30 minutes during the mix.
References that arrive after the mix is half-done force backtracking; references at prep stay useful the entire session.
The Bottom Line
Mix preparation is not the exciting part of mixing. It is the part that decides whether the exciting part takes three hours or three days.
Six steps, around 90 minutes, every session. Arrange and clean, clip gain, comp, phase and timing, route and color, and references.
Do all six, and the mix that follows is a series of small decisions against a clean foundation.
After prep, the mix itself starts with placement, and audio panning secrets maps that stage.
From there the work is tone and dynamics, covered across every source in the complete EQ guide and grounded in the complete compression guide.
When the mix is printed, the complete mastering guide takes the handoff.