You’ve spent forty minutes on a lead vocal. The verses sit fine. The chorus pokes through every time the singer leans in.
You pull the threshold down, the chorus tames, the verses disappear under the bed. You pull it up, the chorus is back to peaking.
The compressor isn’t broken. You’re using one tool to do the job of three.
Vocal compression is the one place in a mix where a single plugin almost never delivers a pro result.
Real engineers stack two or three compressors, each doing one specific job: tame the loudest peaks, even out syllable-to-syllable dynamics, and add a touch of glue.
Get the order and the settings right and a vocal stops fighting the mix and starts living in it.
This is the full playbook: the two-compressor core chain, the four scenarios it bends into, and the parallel, de-essing, and sidechain moves stacked on top.
Backgrounds get their own treatment at the end.
TL;DR
- Gain-ride first. Manual fader rides reduce 70% of the dynamic problem before you touch a compressor.
- Use two light compressors, not one heavy one. 2–3 dB GR each beats 6 dB on one plugin.
- Ratio: 3:1 to 4:1 for the main chain. 8:1+ only for transient taming.
- Attack: 10–15 ms (preserve consonants), release: 60–100 ms.
- De-ess after the first compressor, before the second.
- Parallel for energy, sidechain for space, multiband for surgical control.
Gain riding comes first, then the chain, then everything that stacks on it.
Where to Start: Gain Riding and Level Matching
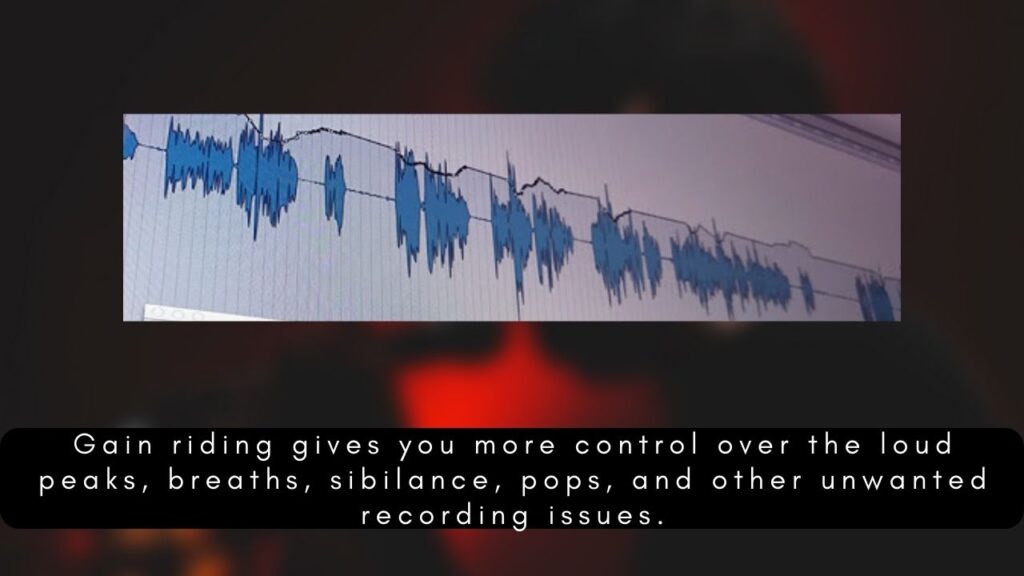
Before you reach for a compressor, ride the fader.
Manual volume automation on a vocal track is the single most effective dynamic-control tool ever invented.
Pull down the loudest words by 3–6 dB; pull up the quietest ones by 2–4 dB. Twenty minutes of fader rides will fix what an hour of compressor-knob-tweaking cannot.
The reason is simple: a compressor reacts to peaks.
If your raw vocal swings 18 dB between verse and chorus, the compressor will either clamp the chorus into the ground or fail to do anything in the verse.
Gain riding gets that raw swing down to 8–10 dB before the compressor sees it. Now every plugin in the chain has a fair fight.
Then level-match. Every compressor pass adds gain via the makeup knob, which makes the engaged plugin sound louder than the bypassed one.
Louder always sounds better. Pull the makeup gain down until A/B-bypass produces no perceived loudness change.
Only then judge what the compressor is doing.
How to Compress Vocals: The Core Chain
The core vocal chain is two compressors in series. The first one tames the loudest peaks (transient catching).
The second one evens out the body of the performance (RMS smoothing). Each does a specific job, and neither does more than 3 dB of gain reduction on its own.
Compressor 1: Peak Tamer (1176-style)
Use a fast FET-style compressor (1176, CLA-76, FabFilter Pro-C in “Punch” mode). Ratio 4:1, attack 1–3 ms, release 50–100 ms.
Pull the threshold until the loudest peaks show 3–5 dB of GR. The fast attack catches the spiky consonants (“p,” “t,” “k”) and the loudest sung syllables.
The release is short enough to recover for the next word.
Compressor 2: Body Smoother (LA-2A-style)
Use a slow opto-style compressor (LA-2A, CLA-2A, FabFilter Pro-C in “Vocal” mode). Ratio 3:1 (often fixed on opto units), attack 10 ms, release 100–200 ms.
Pull the threshold until you see 2–3 dB of GR on average and 4 dB on peaks.
The slower attack lets the consonants through (Compressor 1 already caught them) and clamps the body of the syllables, which is where “evenness” lives.
For a fuller breakdown of how attack and release shape the result, see our attack and release settings guide.
Why two compressors beat one
A single compressor pulling 6 dB of GR will always sound more processed than two compressors pulling 3 dB each.
Each one is barely working, so each one introduces a smaller amount of pumping, distortion, and timbral coloration.
The total gain reduction is the same. The artifacts are dramatically smaller.
Want to see how dynamic your vocal actually is before you set the threshold? Drop your WAV or MP3 into the Compression Analyzer.
Vocal Compression Cheat Sheet (4 Scenarios)
The settings above are the safest starting point for a typical pop, R&B, or rock lead vocal. But not every vocal needs the same shape.
These are the four most common starting kits, sorted by the problem you’re trying to solve. Pick the one that matches the singer in front of you, not the genre alone.
If you would rather sort by genre, that table is the vocal compression cheat sheet.
| Scenario | Ratio | Attack | Release | Gain Reduction |
|---|---|---|---|---|
| Dynamic (smooth swings) | 3:1 | 10–15 ms | 80–120 ms | 2–3 dB average |
| Tonal (add character) | 4:1 | 1–5 ms | 50–80 ms | 3–5 dB |
| Transient taming (spiky consonants) | 8:1+ | 0.1–1 ms | 30–50 ms | 4–8 dB on peaks only |
| Punchy (preserve energy) | 4:1 | 20–30 ms (slow) | 100–150 ms | 3–5 dB |
Serial Compression: Two Light Compressors Beat One Heavy One

Serial compression is the technique behind almost every modern pop vocal.
It’s the “1176 into LA-2A” chain heard on records since the 1970s, and it remains the cleanest way to get 5–6 dB of total gain reduction without the vocal sounding squashed.
The trick is that each compressor barely works. The first one catches transients with a fast attack.
The second one smooths the body with a slow attack. Neither one ever sees more than 3 dB of gain reduction on its own.
The artifacts (pumping, distortion, and harmonic coloration) scale with how hard a single compressor is working.
So two compressors at 3 dB sound dramatically cleaner than one compressor at 6 dB.
Order matters. Always run the fast (peak-tamer) first and the slow (body-smoother) second.
If you reverse the order, the slow opto will let consonants through, the fast FET will then catch them, and the chain sounds harsh and over-processed.
Parallel Compression for Power Without Squeeze
If serial compression handles the dynamic problem, parallel compression handles the “size” problem.
A vocal can be perfectly even but still feel small and thin in the mix. Parallel adds weight and presence without touching the dry channel.
Send the vocal to an aux. On the aux, set a hard compressor: ratio 8:1+, attack 1–3 ms, release 60–100 ms, 8–12 dB of gain reduction.
The crushed signal will sound plasticky and wrong in solo. That’s fine. Blend it back under the dry vocal at -15 to -20 dB.
The vocal now has the original transients, the original tone, and a layer of crushed energy underneath that gives it weight.
Roll off the parallel bus below 200 Hz to keep the low end from muddying up. Roll off above 8 kHz if the parallel sounds harsh.
Many engineers also automate the parallel send to be louder in choruses than verses. That keeps the vocal energy scaled with the song’s emotional arc.
This is the single-aux version; parallel compression on a vocal takes it further into the cases where one crushed bus is not enough.
Try the chain on a real vocal: drop a verse, a chorus, or a full lead into the Compression Analyzer →.
De-essing and Multiband: Frequency-Specific Control
Some vocal problems aren’t level problems, they’re frequency problems.
Sibilance (“s,” “sh,” and “t” sounds at 5–9 kHz) and resonant nasal honk (1–3 kHz) are both about specific frequency bands being louder than the rest of the vocal.
A standard wideband compressor can’t fix either without flattening the whole vocal.
De-essing
A de-esser is a narrow-band compressor watching a specific frequency range (typically 5–9 kHz for “s” sounds).
When the energy in that band exceeds the threshold, it clamps just that band, leaving everything else untouched.
Place the de-esser between Compressor 1 and Compressor 2 in the chain.
That way Compressor 1 has already brought the worst peaks down (which reduces the sibilance level before the de-esser sees it), and Compressor 2 is smoothing what the de-esser leaves behind.
For a focused walkthrough on this, see our vocal de-essing guide.
Multiband compression
A multiband compressor splits the vocal into 3–5 frequency bands and runs an independent compressor on each.
It’s useful when a vocal has a specific tonal problem (boomy lows on long-vowel words, harsh top end on bright syllables) that only shows up some of the time.
Target the problem band only, leave the rest untouched. Subtle is the rule. 1–3 dB of GR on a single band is plenty.
Multiband compression on vocals works through the crossover placement and the per-band settings.
Sidechain Compression on Vocals (Creating Space)
Sidechain compression on vocals is a creative move, not a corrective one.
You’re using one signal to trigger the compressor on another, almost always to create space in a busy arrangement.
The most common use is ducking instrumental beds under the vocal. Put a compressor on the music bus and set its sidechain input to the vocal.
Tune the attack to 5–10 ms and the release to 200 ms, so the music dips by 2–4 dB whenever the vocal sings and comes back up between phrases.
The listener doesn’t hear the ducking. They hear the vocal sitting clearly above the band.
Reversing the sidechain is a less common but valid trick in modern pop and trap.
The vocal compressor gets triggered by the kick or snare, so the vocal ducks briefly on each hit to leave room for the bottom-end punch.
Lead Vocals vs. Background Vocals

Lead and background vocals serve different roles and get compressed accordingly. Treating them the same is one of the fastest ways to make a track sound amateur.
Backgrounds need to glue into a single sonic layer. The lead needs to feel intimate and present.
Lead vocals get the full chain above: serial peak-tamer + body-smoother + de-esser + optional parallel.
The goal is intimacy, clarity, and weight without flattening the performance. 4–5 dB total GR across the chain is typical.
Background vocals should be compressed much harder to glue them into a wall.
Bus all your backgrounds together, then hit the bus with a single compressor: ratio 6:1+, attack 10 ms, release 100 ms, and 6–8 dB of GR.
The individual takes lose their identity, and the stack becomes one cohesive instrument. That’s exactly what you want.
Backgrounds are texture, not lead vocals competing with the lead.
3 Common Mistakes
When a fully-chained vocal still sounds wrong, one of these three is usually why. All three are cheap to fix once you spot them.
- One compressor doing too much work. If a single plugin is pulling 6+ dB of GR, the artifacts will be audible no matter how good the plugin is. Split the work across two compressors at 3 dB each. The total GR is the same, the sound is dramatically cleaner.
- Skipping gain rides. No compressor chain compensates for a vocal that swings 18 dB between verse and chorus. Manual fader rides are not optional on a serious vocal mix. They are the first step, before any plugin.
- De-essing in the wrong place. De-essing before any compression makes the de-esser work too hard, because the raw peaks haven’t been brought down yet. De-essing after both compressors makes the de-esser fight processed audio. Place it between Compressor 1 and Compressor 2.
Ready to stop guessing? The Compression Analyzer will show your vocal’s crest factor, tell you which dynamic band it falls into.
Frequently Asked Questions
Six questions from the first month of compressing vocals seriously. Each answer assumes a standard pop, R&B, hip-hop, or rock production context.
Jazz and classical follow different conventions.
What ratio should you use for vocal compression?
For the main chain, 3:1 to 4:1 on each compressor. Use 4:1 on the first (fast peak-tamer) and 2:1 to 3:1 on the second (slow body-smoother).
Anything above 6:1 on a single vocal compressor starts to sound squashed.
Higher ratios (8:1+) are appropriate only for transient taming when consonants are spiking hard, or on the parallel bus where the crushed signal is being blended back under the dry channel.
Fast or slow attack on vocals?
Both, in sequence. The first compressor in the chain wants a fast attack (1 to 5 milliseconds) to catch consonant spikes.
The second compressor wants a slow attack (10 to 20 milliseconds) to let consonants through (the first compressor already caught them) and clamp the body of the syllables.
A single compressor with a medium attack of 10 to 15 ms is the best one-plugin compromise if you only have room in your CPU budget for one stage.
How much gain reduction is right on a lead vocal?
2 to 3 dB on each compressor in the chain, 5 dB total across the chain.
Anything over 6 dB total tends to flatten the performance and make the vocal sound static.
If you need more dynamic control than 5 dB provides, the answer is gain riding, not more compression.
A vocal that swings 18 dB raw should be rode down to a 10 dB swing manually before the chain ever sees it.
Should you EQ before or after compressing vocals?
Subtractive EQ before compression, additive EQ after.
Cut the low rumble (below 80 Hz) and any harsh resonance (often 2 to 3 kHz) before the compressor sees the signal.
That way the compressor reacts to musical content rather than to a problem frequency.
Boosts for air (10 kHz+) and warmth (200 Hz) belong after the compressor, where they shape the already-controlled signal rather than getting compressed themselves.
Do you need two compressors on a vocal (serial compression)?
For a polished modern pop or R&B vocal, yes, in almost every case.
Two compressors at 3 dB each will always sound cleaner than one compressor at 6 dB, because compressor artifacts scale with how hard a single unit is working.
A simple acoustic or jazz vocal might only need one stage with very gentle settings.
The 1176-into-LA-2A chain remains the dominant pro vocal chain because it spreads the work across two specialized units.
How do you compress background vocals differently from the lead?
Backgrounds get compressed much harder than the lead on a bus, with the goal of gluing them into a single texture.
Bus all your background stacks together, then hit the bus with a 6:1+ ratio, 10 ms attack, 100 ms release, and 6 to 8 dB of gain reduction.
The individual takes lose their identity, which is exactly what you want. Backgrounds are texture sitting behind the lead, not multiple competing lead vocals.
The Bottom Line
Vocal compression done well is the difference between a track that sounds amateur and one that sounds pro.
The key isn’t a louder plugin, it’s a chain: gain rides first, then a fast peak-tamer at 3–5 dB GR, then a de-esser, then a slow body-smoother at 2–3 dB GR.
Parallel for energy. Sidechain for space. Multiband for surgical fixes. Match each tool to the specific problem in front of you.
And if you’d rather skip the meter reading altogether, the Compression Analyzer gives you the crest factor and settings in about 3 seconds.
Vocals are the hardest source to compress well, which makes them a good place to learn.
The complete audio compression guide applies the same chain logic to everything else in the mix.