Your drums sound fine soloed, then you drop them in the mix, and the kick is boomy, the snare is boxy, and the cymbals are slicing your ears off.
You know EQ fixes it, but you are sweeping around blind on every track, burning an hour on a kit that should take ten minutes to get into the ballpark.
This is the page you bookmark. Below is a fast frequency map for every piece of the kit.
The table covers the high pass, the mud cut, the body and attack boosts, and the air for kick, snare, toms, hi-hats, overheads, and room mics.
Use it as a starting point, dial by ear, and reach for the linked deep-dives when one drum needs the full treatment.
These are starting points, not destinations, since every kit and room is different.
Quick Reference: Drum EQ Frequencies
Here is the whole kit at a glance.
Each row is a starting point for that drum: where to high-pass, the frequencies that usually need cutting, and the boosts that bring out body and attack.
Always confirm the exact spot by sweeping, since these move with the drum, the tuning, and the room.
| Source | High-pass | Cut (mud / problem) | Boost (body / attack) | Air / top |
|---|---|---|---|---|
| Kick | 20–30 Hz | 200–500 Hz (boxy) | 60–100 Hz body, 2–4 kHz beater | 5–8 kHz click |
| Snare | 80–120 Hz | 400–800 Hz (boxy) | 150–250 Hz body, 2–5 kHz crack | 8–12 kHz snap |
| Toms | 60–100 Hz | 300–600 Hz (boxy) | 80–200 Hz body, 3–6 kHz attack | 8–10 kHz sheen |
| Hi-hats | 200–400 Hz | 1–4 kHz (clank/harsh) | — | 8–12 kHz crisp |
| Overheads | 300–600 Hz | 2–5 kHz (harsh) if needed | — | 10–15 kHz shimmer |
| Room mics | 80–150 Hz | To taste for tone | Low mids for weight | Highs for ambience |
Kick
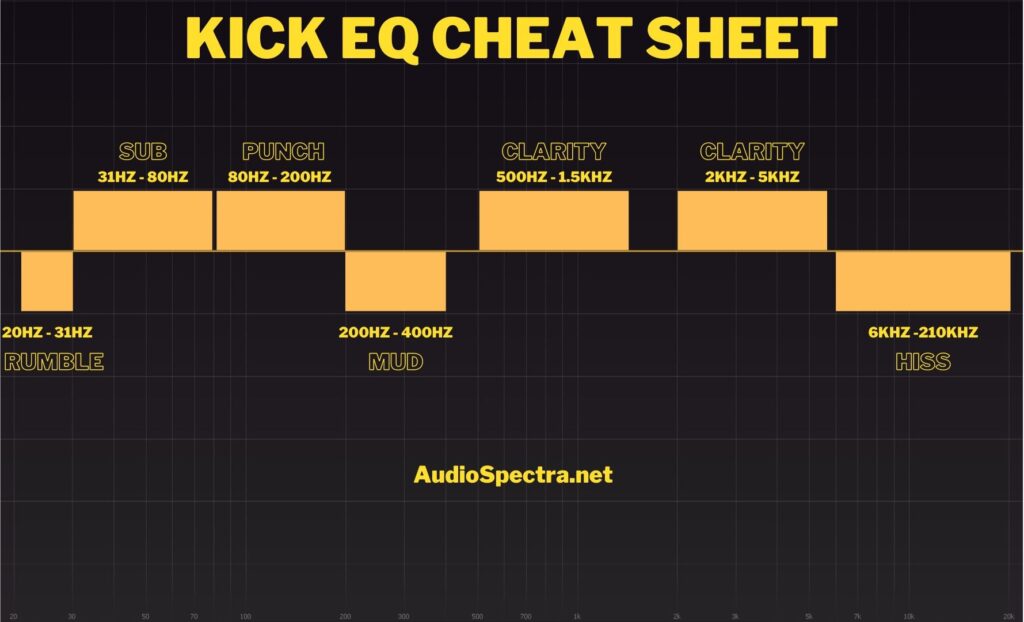
The kick lives in the low end, so the goal is weight without boom and click without flab.
High-pass below 30 Hz to clear sub rumble, then boost 60–100 Hz for the body and weight.
Cut the 200–500 Hz mud that makes it boxy, and add 2–4 kHz for the beater attack so it cuts through on small speakers.
That gets you in the ballpark fast.
For the full method, including tuning, sample blending, and genre targets, see the dedicated guide to kick drum EQ.
Snare
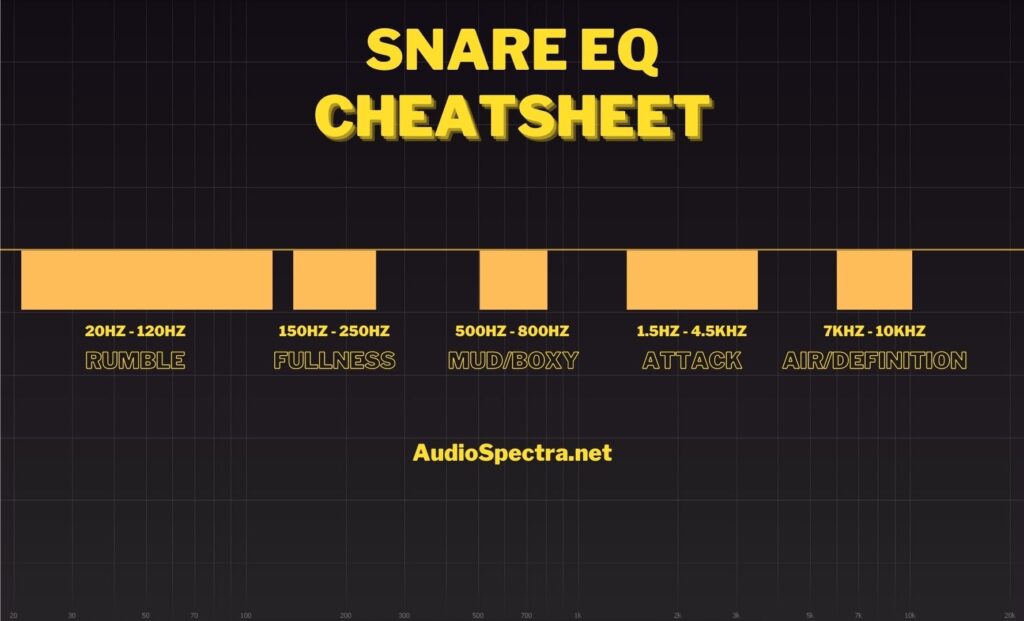
The snare needs body, crack, and snap without boxiness.
High-pass around 80–120 Hz, add 150–250 Hz for fatness, and cut the 400–800 Hz boxy buildup that crowds the mix.
Boost 2–5 kHz for crack and 8–12 kHz for the snap of the wires.
Sweep to find the exact boxy spot, since it shifts with tuning. The full walkthrough lives in the guide to snare EQ settings.
Toms
Toms want weight and a clear attack, plus aggressive cleanup, since open tom mics pick up the whole kit.
High-pass 60–100 Hz, boost 80–200 Hz for body and 3–6 kHz for the stick attack, and cut the 300–600 Hz box.
Gating or careful editing helps even more than EQ here, because of the bleed.
Read the complete how-to EQ Tom guide for the full breakdown. You’ll learn to target floor and rack toms, tame boom and boxiness, and handle messy bleed for punchy, professional results.
Hi-Hats
Hi-hats are all top-end, so the work is mostly cleanup.
High-pass aggressively, 200–400 Hz or higher, to remove low-end bleed from the kick and snare.
Tame any clank or harshness in the 1–4 kHz range, then add 8–12 kHz for a crisp, clean sparkle if needed.
For the full method, see the dedicated guide to how to EQ hi-hats.
Overheads and Cymbals
Overheads capture the whole kit, so treat them as the cymbals plus the glue, not just the cymbals.
High-pass 300–600 Hz to clear the low-end buildup, tame harshness around 2–5 kHz if the cymbals bite, and add 10–15 kHz for shimmer and air.
Many engineers use the overheads as the main kit picture and blend the close mics underneath.
To help you get started, here is an EQ guide for overheads with some tips and handy frequency charts.
Room Mics
Room mics are about vibe and weight rather than precision, so EQ them to taste.
A high pass around 80–150 Hz keeps the low end controlled, while boosting the low mids adds size, and crushing them with compression brings the energy.
There is no single right setting here, since the room sound is a creative choice.
3 Common Mistakes
A few habits waste time and muddy the kit. Avoid these, and the cheat sheet does the rest.
1. EQing every drum in solo. A kick that sounds great alone often disappears in the mix.
Set the broad strokes in solo if you must, but make the final calls with the whole kit and track playing.
2. Boosting instead of cutting the mud. Boxiness and mud in the low mids are the main reason a kit sounds cluttered.
Cut 200–600 Hz on the offenders before you reach for boosts, and the whole kit opens up.
3. Forgetting to high-pass the bleed. Hi-hat and overhead mics carry low-end bleed that piles up across the kit.
High-pass them firmly so the kick and snare own the low end.
Frequently Asked Questions
Quick answers to the questions that come up most when EQing a drum kit.
What frequencies should I cut on drums?
The main cut on most drums is the boxy, muddy low-midrange.
Cut around 200–500 Hz on the kick, 400–800 Hz on the snare, and 300–600 Hz on toms and overheads to clear congestion.
Sweep a narrow boost to find the worst spot first, then cut a couple of dB there.
High-passing hi-hats and overheads above 200–400 Hz also removes low-end bleed that muddies the kit.
What frequency gives a kick drum punch?
Kick punch comes from two areas.
The 60–100 Hz range gives weight and body, while the 2–4 kHz range gives the beater click and attack that lets the kick cut through on small speakers.
Boost both to taste, then cut the 200–500 Hz mud between them so the punch is not buried.
High-pass below 30 Hz to clear rumble that eats headroom.
How do you EQ a snare to cut through?
Boost 2–5 kHz for crack and presence and 8–12 kHz for the snap of the wires, which is what helps a snare cut through a dense mix.
Add 150–250 Hz for body if it sounds thin and cut the 400–800 Hz boxiness that crowds the low mids.
High-pass around 80–120 Hz to clean up rumble without thinning the fundamental.
Where should you high-pass overheads and hi-hats?
High-pass hi-hats around 200–400 Hz or higher and overheads around 300–600 Hz.
Both mics pick up low-end bleed from the kick and snare that piles up and muddies the kit, and neither needs that low end to sound right.
Filter firmly, listening to make sure the cymbals keep their weight, so the close mics own the bottom and the kit stays clean.
Should you EQ drums in solo or in the mix?
Mostly in the mix.
Soloing is useful for finding a specific problem frequency to cut, but a drum that sounds great alone often masks or gets masked once the full track plays.
Set the broad moves quickly, then make the final EQ decisions with the bass, vocals, and the rest of the kit playing, since that is what the listener hears.
Is EQ or compression more important on drums?
They do different jobs, so you want both, but EQ usually comes first.
EQ shapes the tone and clears the masking that makes a kit sound cluttered, while compression controls dynamics and adds punch and sustain.
Carve the frequencies with EQ so each drum has its own space, then use compression to shape the envelope and glue the kit together.
The Bottom Line
Drum EQ comes down to a handful of repeatable moves: high-pass the rumble and bleed, cut the low-mid mud, and boost the body and attack that make each drum speak.
Start from the table, sweep to confirm on your own kit, and always judge in the full mix.
Get those basics right, and a kit snaps into focus in minutes instead of hours.
This cheat sheet is the fast reference. The complete EQ guide covers the technique behind every move, across the whole mix.